Thursday, December 29, 2011

Double Cheddar Biscuits

We love biscuits! My Dad would make biscuits for breakfast and serve it with gravy or syrup. My Dad is from the South and My Mom is from the North. My breakfast was like the best of both worlds. I didn't want gravy but maple syrup.
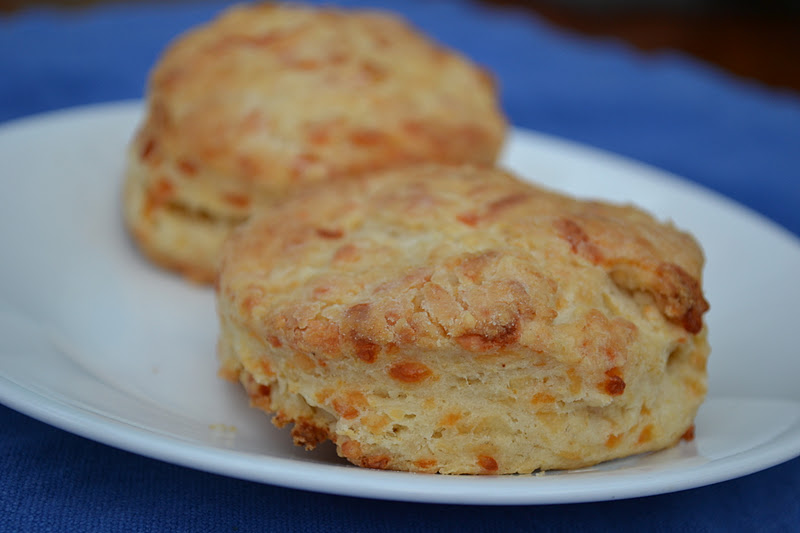
I would not recommend these biscuits for breakfast but supper/dinner. They have double the amount of cheddar. My children had at least two biscuits each. I served these with soup. The biscuits are hardy so if you have never made biscuits before then I recommend trying these biscuits.
Double Cheddar Biscuits
2 1/2 cups all purpose flour
2 tsp baking powder
1 1/2 tsp salt
1/2 tsp sugar
1/4 tsp cayenne pepper
1/2 cup (2 oz.) shredded extra sharp white cheddar cheese
1/2 cup (2 oz.) shredded sharp orange cheddar cheese
3 Tbsp cold unsalted butter, cut into 1/2 inch pieces
1 cup heavy cream
1/8 to 1/4 cup buttermilk

Directions:
  1. The rack needs to be in the center of the oven.
  2. Preheat oven to 425 degrees.
  3. Line a baking sheet with parchment paper.
  4. In a large bowl, whisk together the flour, baking powder, salt, sugar, and cayenne.
  5. Add the shredded cheeses and incorporate well.
  6. Add the cold butter by rubbing the butter into the flour mixture with your fingers until the mixture resembles oatmeal.
  7. Stir in the heavy cream and mix.
  8. Add a little of the buttermilk at a time and stir. The dough should be chunky and a little dry but not too dry if so add a little more buttermilk but you do not want sticky dough.
  9. Onto a lightly floured surface, turn the dough and begin to knead to form a cohesive dough.
  10. Roll the dough out to a 1/2 inch thickness. 
  11. Dip a fork into flour and evenly prick holes over the dough.
  12. Take a round 2 1/2 inch biscuit cutter, cookie cutter, or glass and cut out the circle biscuits. Re-roll the left over dough and repeat cutting out additional biscuits.
  13. Place the biscuits onto the parchment paper spaced about 3 inches apart.
  14. Bake the biscuits for 16 minutes or until browned.
  15. Allow the biscuits to cool slightly before serving.
Recipe adapted from Better Homes and Gardens.
Did you already know............
-In America, biscuit is referred to a soft bread.
-In England, biscuit is a hard cookie or cracker.
-Biscuits have been around before Roman times.

Wednesday, December 28, 2011

Chocolate Cupcakes

My son has been singing "Its the best day ever." He has been singing this song since Christmas morning. I have a strong feeling he was happy with all of his gifts.
 Since Christmas, we have a lot of family and friends with birthdays. I decided to make a chocolate cupcake. Since this cupcake is not the Boozy Bourbon Chocolate Cupcakes, these cupcakes are perfect for everyone.  I did put a little instant chocolate pudding in the middle instead of the previous filling. Also, the difference between the previous frosting and this one is I replaced the liqueur with melted unsweetened chocolate.
Moist Chocolate Cupcakes


2 cups cake flour
1 1/2 tsp baking powder
1/2 tsp baking soda
1/2 tsp salt
3/4 cup unsweetened cocoa powder
1/2 cup unsalted butter, soft
1/3 cup vegetable oil
1 tsp vanilla extract
1 3/4 cup milk
4 large eggs

Directions:
  1. Line 18 cupcake tin with liners.
  2. Preheat oven to 350 degrees.
  3. Sift the flour, baking powder, baking soda, salt, cocoa, and sugar.
  4. In a separate bowl, beat the butter at low speed for 1 minute.
  5. Add the oil to the butter and continue beating until texture of sand.
  6. Add the milk with the vanilla to the butter. 
  7. Mix for about 2 minutes while scraping down every minute.
  8. Add the eggs one at a time. Beat well. The batter should be thin.
  9. Fill the cupcake liners about 3/4 full. 
  10. Bake the cupcakes for about 20 minutes or a toothpick inserted in the middle comes out clean.
  11. Allow the cupcakes to cool before frosting.
Recipe adapted from the Moist Chocolate Cake recipe on the back of the King Arthur Flour unbleached cake flour blend.
Did you already know............
-Medieval pudding was made out of meats.
-In the 1930s, instant puddings were available. 
-The first instant pudding Jello introduced was chocolate.

Tuesday, December 27, 2011

Cinnamon Rolls

My Dad would make cinnamon rolls once a year. He would make so many rolls we would be eating them for weeks (at least it seemed that way). He would also give a lot of the cinnamon rolls away to friends.
Since my children love cinnamon rolls, I figured it would be a nice treat to make for the holidays. I have made this recipe before. The recipe makes a lot of rolls so I recommend following in my Dad's example and sharing. The recipe does freeze well just in case you do not want to share. I made 7 pie pan of these cinnamon rolls so be prepared to make new friends. I used skim milk in the recipe since that is what we had in the house.
Cinnamon Rolls
Rolls:
4 cups of milk 
1 cup vegetable oil
1 cup sugar
2 packages (4 1/2 tsp) active dry yeast
9 cups all purpose flour
1 1/2 tsp baking powder
1 tsp baking soda
2 tsp salt

Filling:
2 cups butter, melted plus more to coat the pans
1/2 cup ground cinnamon
2 cups sugar
7 disposable foal cake/pie pans

Icing:
2 lbs. powder sugar, sifted
1/2 cups milk
6 Tbsp butter, melted
1/4 cup brewed coffee, decaffinated
1/4 tsp salt
1 Tbsp maple syrup

Directions:
  1. Heat the milk, vegetable oil, and sugar in a large saucepan just to below a boil over medium heat.
  2. Let the milk mixture cool to warm (around 110 degrees).
  3. Sprinkle the yeast on top of the milk mixture and let it sit for 1 minute.
  4. Add 8 cups of flour and stir to combine. 
  5. Cover the mixture with a clean kitchen towel and set aside in a warm place for 1 hour.
  6. After the hour, add the baking powder, baking soda, salt, and the remaining 1 cup of flour to the mixture. Stir to combine. (Store in the refrigerator up to 3 days or prepare rolls immediately after chilling for one hour first.)
  7. Punch down the dough after chilling. 
  8. Remove half the dough from the pan.
  9. Flour a clean baking surface and roll out the dough thinly to 30x10 inches. 
  10. Pour 3/4 cups of melted butter over the surface of the dough. Spread the butter evenly over the dough. 
  11. Generously sprinkle 1/4 cup ground cinnamon and 1 cup of sugar evenly over the butter.
  12. Working slowly, roll the dough tightly towards the other end of the dough forming a log. 
  13. After rolling to the other end, pinch the dough seams together. Flip the roll so the seam is facing the surface.
  14. Cut the dough into 1/2 inch slices.
  15. Coat the disposal pans with melted butter.
  16. Place about 7 to 9 cinnamon rolls into the pan without overcrowding.
  17. Repeat the process with the other half of the dough. Let the dough rest on the counter for at least 20 minutes before baking.
  18. Preheat oven to 375 degrees. 
  19. Bake the cinnamon rolls for 15 to 18 minutes.
  20. While the rolls are baking, prepare the icing.
  21. In a large bowl, whisk together the powdered sugar, milk, butter, coffee, and salt.
  22. Add the maple syrup and whisk until very smooth. Taste and adjust the icing to taste. 
  23. Drizzle the icing over the cinnamon rolls immediately after the cinnamon rolls are removed from the oven. 
  24. Allow the cinnamon rolls to cool and enjoy/share. 
Recipe adapted from The Pioneer Woman Cooks cookbook.
Did you already know............
-Cinnamon Rolls are called "kanelbulle' in Sweden.
-On Oct. 4th, it is known as National Kanelbulle Bun day in Sweden.
-In Europe, cinnamon rolls are commonly topped with nib/pearl sugar.
-In America, the cinnamon roll is commonly topped with a glaze/icing.


Monday, December 26, 2011

Penguin Cupcakes

Today is my Mom's birthday. She was born in the parking lot during a blizzard. By the time the doctor arrived on scene, Christmas was over so he put her birthday as December 26. Would you prefer a Christmas birthday or a day right around it? 
To honor my Mom, I had to post a cupcake recipe. My sister has the book Hello, Cupcake! book. It is pretty amazing. My sister makes the creations from the book often. Since she is such a generous sister, she lets me borrow it from time to time. We would prefer the already completed cupcakes (hint, hint). As my sister warned me, these cupcakes take awhile to make. I did leave the wings off of the recipe.
Let's be friends!
March of the Penguins Cupcakes
12 cupcakes, baked and cooled in cupcake liners
12 cake pops (recipe found here)
1 (16 oz) can of vanilla frosting
2 (16 oz) can of dark chocolate frosting
4 marshmallows
7 yellow/orange Starbursts
24 mini chocolate chips
black food coloring gel.
7 thin chocolate cookies (if you prefer your birds with wings)

Directions:
  1. Take about 1 tsp of vanilla frosting and dab it on a doughnut hole.
  2. Place the doughnut hole onto the cupcake so the frosting glues the hole in place. Repeat with the remaining cupcakes.
  3. Place the cupcakes in a freezer/refrigerator to harden.
  4. Cut about 1/8th of the end of the marshmallows. Then cut off about 1/3 of the marshmallow piece to create the white belly part.
  5. Cut the Starbursts diagonal. (I cut each diagonal in half vertically so the beak would not have so much weight.)
  6. Remove the foil seal completely off one of the chocolate frosting container. Inspect the frosting container for any metal. If so, remove the metal before microwaving or add the frosting to a microwave safe bowl.
  7. Add some of the black food gel to the chocolate frosting to make the frosting black.
  8. Microwave the chocolate frosting for 30 seconds and stir. Microwave for about 20 seconds longer if needed for the frosting to be very runny.
  9. Dip the cold cupcake into the runny frosting. Place the cupcake aside.
  10. Repeat with the remaining cupcakes.
  11. Place the cut marshmallow piece on to the chocolate covered cupcake just above the liner. Repeat with the remaining cupcakes.
  12. Add the cut Starbursts to the bottom half of the chocolate covered doughnut hole. A little chocolate frosting may help adhere the pieces if needed. Repeat with the remaining cupcakes.
  13. Place the cupcakes in the freezer/refrigerator to harden. 
  14. After 30 minutes or longer, pipe two dots of white frosting above the Starbursts beak to form two eyes.
  15. Place two mini chocolate chips with pointed side into the frosting for the pupis. Repeat with the remaining cupcakes.
  16. If wings are desired (or if you have time), secure the cookie in place with some of the chocolate frosting.
  17. Allow the cupcakes to rest for several hours before serving so the frosting can set. 
  18. If the frosting on the cupcake is rough, take a dab of water on your finger and smooth out the rough areas.
Recipe adapted from Hello, Cupcake! cookbook.
I'm first in line.
Did you already know...............
-Penguins spend 75% of their time in the water.
-Penguins have a special gland in their body so they can drink salt water.
-A group of penguins are called rookery or colonies.
-A penguin born with brown and not black plumage are called Isabelline penguins. The odds of an Isabelline penguin is 1 out of 50,000.
-There are albino penguins but they are extremely rare.

Saturday, December 24, 2011

Snowman Sugar Cookies

We make sugar cookies every year for Santa. The kids love it. They can roll the dough and cut out any shape they want. Plus they get to decorate their cookies with the sprinkles, frosting, and especially the colored sugars. These are the cookies we are leaving for Santa.
When I was a kid, I loved watching all of the holiday specials. Rudolph and Frosty were always playing. My favorite show was The Year Without Santa Claus. I loved the Heat Miser and Mr. Freeze fighting.
 Sugar Cookies
3 cups all purpose flour
2 tsp baking powder
1 cup sugar
2 sticks salted butter, cold
1 egg
1 1/2 tsp vanilla extract
1/4 tsp pure almond extract

Directions:
  1. Preheat oven to 350 degrees.
  2. In a food processor, add the flour with the baking powder and sugar. Pulse about 5 times.
  3. Add the butter and pulse for about 15 times or until it looks like a course crumble.
  4. Add the egg with the extract and pulse until well incorporated. 
  5. Scoop the mixture onto a floured surface and knead together to form a ball.
  6. Roll out the dough and cut into desired shapes.
  7. Place the cookie dough onto a parchment lined cookie sheet and place in the freezer for 5 minutes.
  8. Remove from freezer and place in the oven. Bake for 10-12 minutes. 
  9. Let the cookies cool on the cookie sheet for a few minutes and then transfer to a cooling rack.
Recipe adapted from Bake at 350. Frosting recipe is found on Bake at 350.

When I first encountered her blog, I thought she was amazing. There was no way I could make cookies that look like hers. Her blog shows step by step and I have now made several cookies which I am amazed. Check out her site.

Did you already know...............
-The Year Without Santa Claus came out in 1974.
-In 1956, the Pultizer prize winner Phyllis McGinley wrote The Year Without Santa Claus.
-The story is how Santa has a cold and believes no one cares about Christmas. Santa's two elves show Santa prove him wrong.
My initial plan
-There is a remake of Mr. Freeze Crank Dat.

Merry Christmas!