Friday, June 29, 2012

Muffin Tops with berries and cream

At the end of the school year, we discovered our grocery store no longer carried frozen muffin tops. They were the go to quick breakfast we could pop in the toaster oven before we ran down the street to chase the bus. I'm just joking about chasing the bus since we do have a great bus driver and he waits for us. I think he waits because he knows I will be rewarding him for his patience the next day with some kind of dessert. I will admit sometimes I feel guilty and wish I was the mom who made their children a big breakfast every school day. I just don't see it happening anytime soon besides on the weekends. My children have never complained and they do eat breakfast every morning but sometimes it is a cooked muffin top.
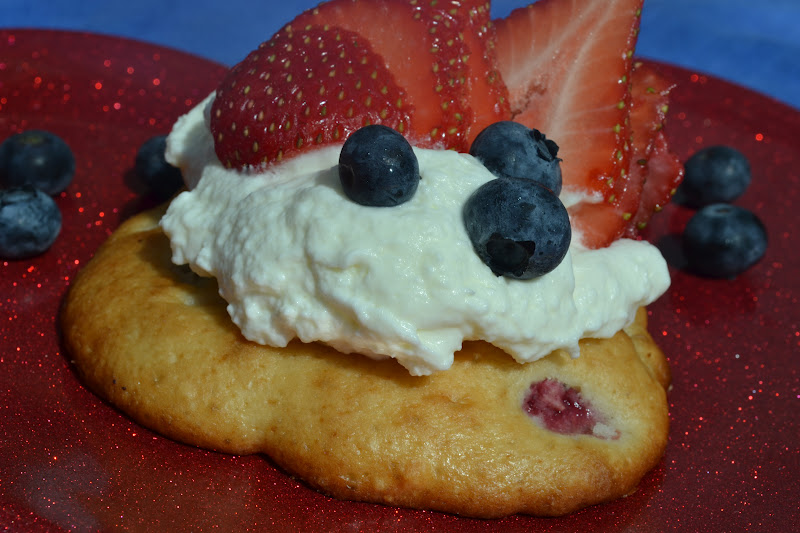
I had to make these red, white, and blue!
Well, I figured I would get a head start and try to make up some muffin tops. My Aunt E made some blueberry muffins when we were visiting and gave me her recipe. My youngest daughter loved the muffins so I had to tweak it to be more of a cross between a muffin and a biscuit. Since I made it at night, I even added berries and whip cream for a delicious dessert. I haven't froze the cooked muffin tops yet but I think they will come out fine. My youngest daughter already told me that she liked these muffin tops better.
Berry Muffin Tops
2 1/2 cups Bisquick baking mix
1/2 cup sugar
2/3 cups low fat milk
2 Tbsp melted unsalted butter
1 egg
1 cup chopped berries (I used fresh strawberries and blueberries)


Directions:
  1. Preheat the oven to 400 degrees F.
  2. Line a baking sheet with parchment paper.
  3. Mix the bisquick, sugar, milk, butter, and egg until incorporated.
  4. Fold in the berries.
  5. Spoon about 1/2 cup of batter onto the baking sheet. Space the batter about 4 inches apart.
  6. Bake the muffin tops for 10 minutes or until golden brown.
  7. Allow the muffin tops to cool for 5 minutes before serving.
Recipe by Jen of Sweet Morris.
*There are many homemade recipes for Bisquick online but I haven't tried them out yet.
Did you already know...
-In 1930, a General Mills executive was served fresh biscuits on a train and asked the chief his secret. The chief told him about his pre-assembled mix of some of the ingredients. The executive went back to the company and  asked the companies chemist to create a baking mix.
-General Mills introduced the Bisquick baking mix in 1931.
-Bisquick is available gluten free.

Tuesday, June 26, 2012

Roasted chicken

I love roasted chicken meals. My family always think I spent a lot of time cooking them. I don't tell them differently since I want them to be impressed. I didn't even peel the potatoes for this dish. I talked my husband into scrubbing them for me. I also cheated by using baby carrots.
My husband would call this a winner winner chicken dinner. The original recipe called for Herbes de Provence seasoning but I wanted to use up the herbs I already had in my kitchen. I did research Herbes de Provence and some recipes called for lavendar and some recipes said the original does not contain lavender. Since I didn't have any lavender, I just made this roasted, herb chicken. Please feel free to express your opinion of Herbes de Provence with or without lavender.
Roasted Herb Chicken with vegetables
1/4 cup white wine
2 Tbsp olive oil

3 lb. bone-in chicken breast and legs
2 tsp dried rosemary
2 tsp dried thyme
2 tsp oregano
2 tsp basil
1 tsp marjoram
1/4 tsp fennel seed
1 lb. small red potatoes, cut into 1 inch cubes

2 cups baby carrots


Directions:
  1. Preheat ove ot 425 degrees F.
  2. Line a baking sheet with parchment paper. 
  3. Spread the chicken and vegetables onto the parchment paper.
  4. In a bowl, mix the wine, oil, and the herbs.
  5. Spread the wine mixture over the chicken and toss.
  6. Arrange the chicken skin side down.
  7. Roast the chicken for 30. Turn the chicken and stir the vegetables.
  8. Continue to cook the chicken for another 15 minutes or until the chicken is cooked through. The vegetables should be tender. 
Recipe adapted from McCormick website.
Did you already know...
-In 1889, Willoughby M. McCormick formed his company at the age of 25 years old in Baltimore.
-Mr. McCormick sold root beer, flavoring extracts, fruit juices and other products under several different trademarks.
-His products were sold door to door during this time.

Sunday, June 24, 2012

Virgins Bloody Marys

When I went to make this weeks Project Pastry Queen, I hadn't realized that I did not have any non-flavored vodka. I figured the Bloody Marys recipe picked by Emily of She Makes and Bakes probably wouldn't taste the best with blueberry vodka. Even if I had drank 5 Bloody Marys, I still would have stayed away from the blueberry vodka. 
When I went to take my photos, my son suddenly appeared. (It is like when you have an important phone call and the children insist they need to talk to you right then even though they had been playing quietly for the last hour.) I was very glad I decided to make these nonalcoholic. I even let him try it. He said it was very spicy but good. He liked the celery sticking out of the drink the best. I liked it but next time I'll definitely add vodka. Isn't that the best part of a Bloody Mary? My husband says the best part is that it is a meal in a drink. He thinks Bloody Marys should be garnished with shrimp and other great toppings. I kept it simple but please check out the other member's version of this recipe. I bet no one used blueberry vodka
Virgin Bloody Marys
4 cups tomato juice
Juice of 2 limes
2 tsp horseradish
2 tsp Worcestershire sauce
1 tsp celery salt
1 tsp Frank's Red Hot sauce
Salt and pepper
Celery for garnish


Directions:
  1. Combine the tomato juice, lime juice, horseradish, Worcestershire sauce, celery salt, hot pepper sauce, salt, and pepper to taste in a large pitcher.
  2. Divide the drinks evenly in 4 glasses and garnish with the celery.
Recipe adapted from The Pastry Queen cookbook by Rebecca Rather.
Did you already know...
-Bloody Marys are a popular brunch drink.
-Bloody Marys are said to be a good hangover cure.
-Bloody Marys tend to be high in sodium.
Bloody Marys are a good disguise!

Saturday, June 23, 2012

Sweet Cakes

We went to see the Disney's Brave. We liked it a lot. Afterwards, the kids asked me for some sweet cakes as in the movie. I searched the internet and did not find anything. Nothing at all. So, I had to create a recipe. The kids loved them. 
They informed me that the Sweet Cakes should have been topped with cherries but I didn't have any. If you have them, it would make a nice topping. I also added some chopped up strawberries to a few and they were good. My son and I liked the jam topping. Any chopped up fruit would be a great addition. Also, top the sweet cakes with any desired fruit. I did top a few with strawberries but I preferred the jam. The Sweet Cakes are like a cross between a cookie and a cupcake. They are soft and tender. Be brave and try them today!
Sweet Cakes
2 1/2 cups flour
1 tsp baking powder
1/2 tsp salt
8 oz. unsalted butter, room temperature
1 cup sugar
 1 egg
1 tsp vanilla
1/2 cup milk

Directions:
  1. Preheat oven to 400 degrees F.
  2. Line a baking sheet with parchment paper and set aside.
  3. In another bowl, whisk together the flour, baking powder, and salt. Set aside.
  4. In a mixer, cream the butter and sugar.  
  5. Add the egg and combine.
  6. Add the  vanilla and mix until incorporated.
  7. To the butter mixture, add 1/3 of the flour and mix.
  8. Repeat with another 1/3 of the flour.
  9. Add the remaining flour to the butter and mix.
  10. Add the milk to the mixture and mix until incorporated. The batter will be thick.
  11. Spoon about 3 Tbsp of batter onto the parchment lined baking sheet.
  12. Space the batter about 4 inches apart.
  13. Bake the sweet cakes about 7 minutes or until golden brown.
  14. Set aside and allow to cool.
Icing
1 cup powder sugar, sifted
3 Tbsp water
1/2 tsp vanilla

Directions:
  1. Combine the sugar, water, and vanilla together.
  2. Drizzle the icing over the sweet cakes.
Top each sweet cake with:
1 tsp of jam
cherries
other desired fruit 

Recipe created by Jen of Sweet Morris.
Did you already know...
-In the movie Brave, Merida's hair consist of 1,500 separate curls.
-Pixar had to create a software for Merida's hair and her movements with her hair which took almost 3 years to develop.
-The original name for the movie Brave was The Bear and the Bow.

Friday, June 22, 2012

Broccoli and Cheese Chicken Pasta

My youngest daughter was trying to talk her brother into giving her some of his money. He asked her if she was mad. She replied, "I'm not mad. I'm brilliant." I guess I will know what to say the next time anyone calls me mad.
Since it has been so unusually hot, I did not want use the oven because I'm not mad yet. I saw this recipe and I figured I would try it. The family liked it a lot and there was plenty leftovers for lunch the next day.
Stovetop Broccoli and Cheese Pasta
1 lb. thin egg noodles
1 tsp vegetable oil
2 cups chicken breast, cut into bite size pieces
8 oz. butter, unsalted
1 garlic clove
1/2 cup all purpose flour
1 tsp. salt
1/2 tsp black pepper
2 1/2 cups chicken broth
1 1/2 cups cheddar cheese, shredded
1 lb broccoli
1 1/2 cups milk

Directions:
  1.  In a large pot, boil the water according to the egg noodle package.
  2. Add the broccoli with the egg noodles when the water is ready.
  3. Drain the pasta and broccoli. Run the pasta and broccoli under cool water to stop the cooking.
  4. In a large saucepan over medium heat, add the oil.
  5. Once the oil is heated, add the chicken. Cook the chicken until browned and cooked through.
  6. Remove the chicken and set aside on a plate.
  7. Add the butter with the garlic clove to the skillet.
  8. Remove the garlic clove after a minute and whisk in the flour.
  9. Add the salt and pepper. Stir.
  10. Slowly, whisk in the chicken broth until combined.
  11. Increase the heat to high and whisk until thick.
  12. Reduce the heat to low and slowly stir in the cheese until melted.
  13. Add the chicken, broccoli, and pasta to the cheese sauce. Stir.
  14. Slowly add the milk to the desired thickness. Mix well. Allow to cook for a few minutes while stirring.
  15. Serve immediately.
Recipe adapted from Picky Palate.
Did you already know...
-Cattle being used as a form of money dates back to 9000 B.C.
-Around 2000 B.C., cattle shaped bronze pieces were used as a form of money.
-Around 650 B.C., the ancient city of Lydia produced coins with the value printed on them.