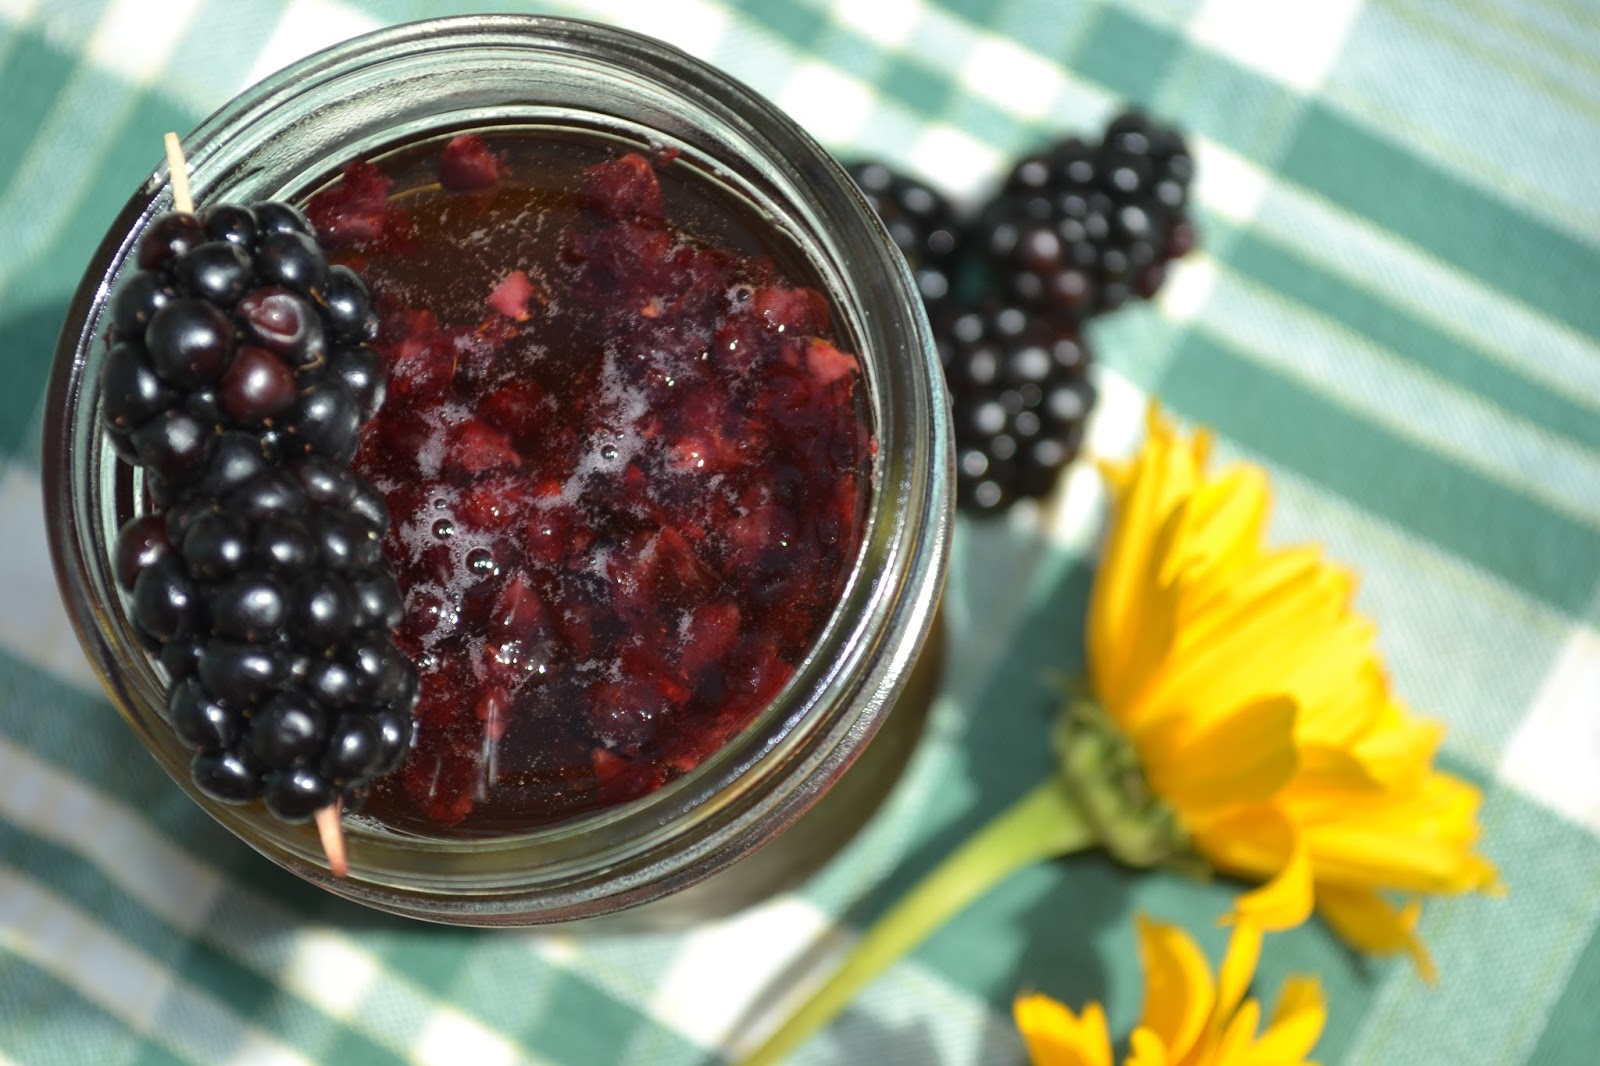
Alright, I know Thanksgiving is months away but I'm already prepping for it. Why? Because the fruit is in peak season now. How many of you have strawberry rhubarb pie at Thanksgiving? Yes, I know pumpkin is popular and so is apple but nothing beats a great berry pie. To be able to have berry pie at Thanksgiving takes months of planning. All I do is prep the filling now. I have tried this technique on strawberry rhubarb and blueberry fillings. I'm not sure about other fruit so if you attempt it then please let me know. This way you can let someone else bring the pumpkin pie at Thanksgiving, you have blueberry pie to make.
How to freeze your pie filling:
- Make your favorite berry pie recipe like blueberry.
- Line a muffin tin with plastic wrap. (I use muffin tin so I can make individual pies at Thanksgiving since I can vary the number due to how many guests are attending.)
- Spoon the pie filling into each muffin space.
- Wrap the top with more plastic wrap.
- Place in the freezer for a couple of hours or until the next day.
- Take out each individual frozen pie filling and place into one large freezer bag. You can individual wrap each disk for more protection.
- Make sure all the air is out of the bag.
- Place the freezer bag into another freezer bag to double wrap it and prevent freezer burn.
- Place the freezer bags with the pie filling back into the freezer and wait.
- When ready to make your pies, roll out the pie crust.
- Make individual pie crust the size of each muffin tin space.
- Place one of the frozen pie filling disk on top of the pie crust.
- Top with another piece of pie crust and bake at same temperature as the regular recipe.
One year ago........................I made Pineapple Kolaches.
Did you already know..........
-Freezer burn is when frozen foods lose moisture.
-Freezer burn can be prevented by proper wrapping.
-Also, freezer should be set at 0 degrees F or below to prevent freezer burn.
I was in my early 20s when I remember having my first Snickerdoodle Cookie. I don't remember having them as a kid. We were a sugar cookie or chocolate chip cookie type family which I still love. I have made Snickerdoodle cookies a few times in the past but it has been years. They are the reason why I purchased cream of tartar. Is there any other reason?
Well, this week I wanted to make some cookies. I was discussing this dilemma at work when my friend suggested Snickerdoodle cookies. When I tried to find the recipe I used, I couldn't find it. I was thinking about just using a sugar cookie recipe and roll the dough into the cinnamon sugar but thought the cookie needs to be soft. I even googled a few recipes but they didn't look right. They should have cream of tartar in them. What I came up for a recipe was what I wanted in a Snickerdoodle. I think they turned out to be exactly right.
Snickerdoodle Cookies
2 sticks unsalted butter, softened
3/4 cup vegetable oil
2 cups sugar
2 eggs
1 Tbsp vanilla extract
4 1/2 cups all purpose flour
1 tsp baking soda
1 tsp cream of tartar
1/2 tsp salt
1 cup sugar mixed with 2 tsp cinnamon
Directions:
- In a large mixing bowl, cream the butter and oil.
- Add the sugar and cream until fluffy.
- Add one egg at a time. Mix well.
- Add the vanilla extract and mix well.
- Add the flour, baking soda, cream of tartar, and salt. Mix until combined.
- Refrigerate for 1 hour.
- Preheat oven to 350 degrees.
- Line a baking sheet with parchment paper.
- In a small bowl, add the cinnamon sugar.
- Scoop about 2 inch balls of dough.
- Roll the dough in the cinnamon sugar and place onto the baking sheet. Space the cookies about 3 inches apart.
- Bake the cookies for 12 to 14 minutes or until the edges are slightly golden. The middle of the cookies should be soft but set.
- Remove from oven and allow to cool on the baking sheet for at least 5 minutes before removing to a wire rack to cool completely.
Recipe by Jen of Sweet Morris.
One year ago, I made...................Victoria Sandwich Cake.
Did you already know..................
-The origins for the Snickerdoodle Cookies are speculation.
-Snickerdoodle cookies are believed to be German origin.
-In U.S, Snickerdoodle cookies began to appear in print in the early 20th century.
My Dad is from Mississippi and he brought us up drinking sweet tea. Normally, he made sun tea. We loved it. While my sister was visiting, I would make some sweet tea. My nieces and my sister really liked the tea so I wanted to post it for her. This way she can make it any time she wants. Now, I know there are more sweet tea recipes than the alphabet. My Dad always added his sugar after the tea was brewed. I've seen many sweet tea with a simple sugar added. Well, I really just wanted to speed up the process to save time so I melt the sugar in the water before adding the tea bags. (Yes, how dare I use a pot but please forgive me since my teapot broke.) Since it is berry season, I have added berries to my tea many times. Today's berry of choice was blackberries.
Berry Sweet Tea
Sweet Tea:
8 cups cold water
1 cup sugar
3 black tea bags
Directions:
- In a small pot, bring 4 cups of water to a boil.
- Add the sugar and stir. Allow the mixture to boil for 1 minute.
- Remove from heat and add the tea bags. Allow to steep until a dark amber color about 4 minutes.
- Add the remaining cold water.
- Serve immediately with ice or refrigerate.
Berry mixture per serving:
1/8 cup berries (4 blackberries)
1/4 tsp sugar
Directions:
- Pour one glass of beverage.
- Sprinkle the berries with the sugar.
- Mush the berries.
- Add the mashed berry sugar mixture to the glass and serve immediately.
Recipe by Jen of Sweet Morris.
One year ago...........................I made Steak and Ale Pie.
Did you already know...............
-Tea bags were invented in America.
-The first tea bag patent was in 1905.
-96% of tea drinks use a tea bag.
I decided to make roast chicken this weekend and I thought I should roast two chickens at the same time. Why didn't I think to do this earlier? It saves so much time. Roasting chickens costs a lot less than chicken breast. I decided to use two different types of herbs on the chicken. One chicken had rosemary and another had oregano. My husband loves chicken salad sandwiches for lunch. He also loves buffalo chicken dip. Also, I can use the cooked chicken for supper in the next couple of days. In the future, I am definitely going to always cook two at once. I can also make a casserole and freeze it if I don't use the meat up in a the next couple of days. For the most part, I kept the recipe simple with only subtle flavor when I decide what to make with it.
Double Roasted Chicken
2 roasting chickens
1 lemon
2 Tbsp olive oil
2 Tbsp herbs
salt and pepper
Directions:
- Preheat oven to 350 degrees.
- Place the roasting chicken in a roasting pan.
- Remove the giblets and neck from the cavity.
- Cut the lemon in half and place one half in each cavity of the birds.
- Drizzle 1 Tbsp over the skin of each chicken.
- Rub in the desired herbs over each bird.
- Season the skin with salt and pepper.
- Roast the chicken for 1 hour and check the chicken with a thermometer inserted into the thickest part of a thigh. The thermometer should register at 190 degrees. The chicken juices should be clear. If not, return the chicken to the oven to continue to cook. Recheck every 20 minutes until the chicken is cooked.
- Remove the chicken from the oven and allow to cool for 10 minutes.
- Serve immediately or remove from the bone and store in a covered container within a couple of days.
Recipe adapted from this recipe.
One year ago.......................I made Peacharine Cream Cheese Tart.
 |
| My helper |
Did you already know.........
-According to the FDA, cooked chicken pieces should be eaten within 3-4 days or frozen up to 4 months.
-Fried chicken should be eaten within 3-4 days.
-Cooked chicken pieces covered in broth or gravy should be eaten within 1 to 2 days.
Are you a stick by your menu household? Do you even make a menu? What to have for supper is sometimes a challenging question at my house? Since I know things come up, I try to keep my menu planning simple for the weekdays. I already plan a day with leftovers since I know there will be an extra flexible day to catch up on the menu when we didn't eat according to the menu. Every week, I take a poll of what to have for supper. A lot of times I receive the standard answer I don't care. Well, the night we are to have spaghetti then all of a sudden someone cares and wants something else. Well, I didn't have omelets on our menu. I will admit my youngest daughter has been asking for omelets so I figured why not. The kids loved it. They added onions to their omelets. If you have picky people in your house, this is the perfect meal to adapt. I really like the flavors plus it's a quick meal.
Italian Omelets per one serving
3 cherry tomatoes, chopped
3 mushrooms chopped
10 spinach leaves, sliced
1 clove garlic, minced
1/4 cup mozzarella cheese, shredded plus a little more for the topping
2 eggs
1 egg white
1 tsp milk
1/8 tsp oregano
1 tsp vegetable oil
1 tsp butter
Directions
- In a small skillet, heat 1/2 tsp oil and 1/2 tsp butter over medium heat.
- Saute the vegetables over medium heat for 2-3 minutes. Remove from the heat and set aside.
- In a large skillet, heat the remaining oil and butter over medium-low heat. Add more oil and butter if needed.
- In a small bowl, whisk together the eggs, egg white, and milk.
- Add the whisked egg mixture to the large skillet.
- Very gently, push up a corner of the egg and tilt the pan slight so the raw egg run into the corner of the pan.
- Once the majority of the egg has set, add the vegetables down the middle of the omelet.
- Sprinkle the
- Gently, fold up one side of the omelet into the middle. Tilting the pan slightly.
- Fold the other side of the omelet into the middle. Tilting the pan again will help.
- Carefully, tilt the pan and slide the omelet to the bottom of the pan.
- Gently turn the omelet over into the middle of the pan so it is flipped over.
- Allow to cook for one more minute before carefully sliding the omelet onto a plate.
- Sprinkle with additional cheese and the oregano.
Recipe by Jen of Sweet Morris.
One year ago.....................I made Shortbread Cookies.
Did you already know.......
-In Ancient Greek, oregano means Joy of the Mountain.
-Oregano belongs to the genus of the mint family.
-Mexican oregano is stronger in flavor than Mediterranean oregano.
(Oregano is my favorite herb.)
 How to freeze your pie filling:
 Did you already know..........