Monday, April 30, 2012

Pasta Salad

Did you know Mother's Day is less than two weeks away? I just can't believe May is here tomorrow. Normally, I visit my Mom on Saturday of Mother's Day weekend. I bring her a gift and visit with her. My husband does the same and brings his Mom a gift. Since I have three sisters, I normally do not have to share my Mom on Saturday. My Mom gets to celebrate the whole weekend for Mother's Day. 
Normally, we spend Mother's Day doing yard work. However, this year I want to go on a picnic. I was hoping to bring the kids on a picnic before now but time has gone by so fast. We have invited our Mom's to join us if they would like. It would be really nice.
I figured I would make pasta salad with supper. I decided to try this recipe from food network's Sandwich King. I had to adapt this recipe a lot due to no asparagus. I already had macaroni noodles. Also, the original recipe did not have a lot of flavor. My oldest daughter told me an artist has to change 70% of a picture to claim it as their own. I'm not sure what the rule would be in cooking. I know if I go into the kitchen with no recipe and create a dish which wasn't inspired by another then I can claim it as my own. If I use another recipe, I would have to change it a lot before I will say it is mine. My oldest daughter insists this needs to be served cold. I liked it both ways. She also said she liked the shredded cheese better since she gets some in every bite. I will admit I added my frozen peas to my pasta water to save on dishes.

Pasta Salad
1 lb macaroni noodles
1/4 cup extra virgin olive oil
1 1/2 tsp Dijon mustard
1 tsp sugar
2 cloves of garlic, minced 
1/8 cup lemon juice
2 Tbsp white wine vinegar
salt and pepper to taste
10 plum tomatoes, cubed
1 cup cooked peas (optional)
1/4 cup roasted yellow peppers
2 sprigs of fresh dill
1 Tbsp oregano
1/4 cup of shredded mozzarella cheese

Directions:
Cook the pasta according to directions.
Mix the olive oil, mustard, sugar, garlic, lemon juice, vinegar, salt, and pepper. Make sure the ingredients are well incorporated.
Toss the olive oil mixture with the pasta.
Add the tomatoes, peas, peppers, dill, oregano, and cheese.
Toss well and refrigerate until ready to serve.

Recipe by Jen of Sweet Morris
Did you already know......
-Distilled white vinegar is the most popular vinegar in America.
-Wine vinegars are more acidity in Europe than in America.
-Vinegar has been used for over 10,000 years.

Sunday, April 29, 2012

Nuevo Texas Waldorf Salad

Today's Project Pastry Queen is a salad. No dessert today. I may make one later since it is Sunday. This recipe was picked by Emily of She Makes and Bakes. I really liked it. My family (not including my husband) liked it. My husband does not eat mixed greens and believe me I have tried. If it isn't iceberg lettuce, he will go make something else.
When I was in the Air Force, I was fortunate to be assigned to photography the 50th Anniversary dinner. It was held at the Broadmoor. (It was the only way I was able to eat there even if my cousin interned at the hotel.) We were served a similar salad. It had pears and blue cheese. Pears could easily be substituted for this recipe. When I make this again, I'm going to purchase the one on sale. It just may be pears. Also, the vinaigrette is suppose to be made with white balsamic vinegar but I used aged balsamic vinegar. I didn't realize my mistake until later which is why my vinaigrette appears dark. I really liked the dressing. It is a versatile recipe. It is fancy but simple.
Nuevo Texas Waldorf Salad
4 cups organic mixed greens
3 Braeburn, Medina, or Granny Smith apples, core and sliced
1/2 cup pecans, toasted
1/2 cup crumbled blue cheese/Gorgonzola crumbles
Rosemary Vinaigrette (recipe below)
Fried Wonton Strips

Directions:
  1. Add the mixed greens, apples, pecans, blue cheese. Toss gently.
  2. Pour half the Rosemary Vinaigrette over the greens and toss to coat.
  3. Add more salad dressing to taste.
  4. Top with the fried wonton strips. Serve immediately.
Rosemary Vinaigrette
1/3 cup rosemary leaves
2 cloves of garlic
1/4 medium onion
2 tsp Dijon mustard
1/4 cup honey
1/2 cup balsamic vinegar
1 1/2 tsp salt
black pepper to taste
1/2 cup extra virgin olive oil

Directions:
  1. Blend the rosemary, garlic, onion, mustard, honey, vinegar, salt, and pepper for 20 seconds in a food processor. 
  2. Add the oil oil through the feed tube in a slow stream until the mixture emulsifies. 
  3. Taste and season appropriate if needed.
Recipe adapted from The Pastry Queen cookbook.
Did you already know...
-In May 1917, the Broadmoor was completed. 
- The owner of the Broadmoor, Spencer Penrose, also established the Cheyanne Mountain Zoo and the Will Rogers Shrine.  
-The hotel has received the Forbes five star award for over 50 years.

Saturday, April 28, 2012

Double Chocolate Cookies

Sometimes I will bake something and I never get a chance to post it. Why? My hidden stash is found. I think I will be finding a new hiding area. When I was a teenager, my best friend's father would hide his sweets in unusual places like the dishwasher. With my luck, my family would decide to do dishes for me and still find them.
Yes, these cookies are worthy of hiding them. I have made these cookies many times. At the moment, they are my favorite cookie.Since they are gigantic, I do share. It is a copy cat recipe from a cookie found at Levain Bakery.
Double Chocolate Cookies
1 cup unsalted butter, cubed and chilled
1 1/2 cup sugar
2 large eggs
1/2 cup dark cocoa powder
2 1/4 cups all purpose flour
1/2 tsp salt
1 tsp baking powder
2 1/2 cups semi sweet chocolate chips

Directions:
  1. Preheat oven to 350 degrees F.
  2. Combine the butter and sugar until light and fluffy.
  3. Add the eggs one at a time to the butter mixture.
  4. Mix in the cocoa powder and blend until well incorporated.
  5. Add the flour, salt, and baking powder and mix until just incorporated.
  6. Fold in the chocolate chips.
  7. Transfer the dough to a clean surface and knead briefly until well combined.
  8. Divide the dough into desired portion size. For giant cookies, divide into 12 equal pieces.
  9. Place the dough onto an ungreased cookie sheet 2 inches apart. 
  10. Bake the dough for about 16 minutes or until set.
  11. Allow the cookies to cool for about 5 minutes before transferring to a wire rack. 
Recipe adapted from Annie's Eats.

Waiting to take one of the last three cookies!
Did you already know...
-The first dishwasher patent was to Joel Houghton in 1850. His patent only splashed water on dishes.
-In 1886, Josephine Cochran decided to invent a workable, mechanical dishwasher in which she reveiled at the 1893 World Fair.
-Her main customers at the time were hotels and large restaurants.
-The general public was interested in her invention until the 1950s.

Does anyone know what famous company Josephine Cochran founded?

Wednesday, April 25, 2012

Stove Top Chili Mac

We just arrived home from vacation. I really think I need a few days longer to rest. We traveled from Maine to Mississippi to Georgia to Virginia to New Jersey and finally home. My children ate catfish, rode horses, and went to an amusement park. The best part of our trip was visiting with friends and family. 
After this trip, I needed something quick for supper. (Sorry, no catfish recipes here.) I made extra to freeze for another time. I did think the original recipe had no chili powder in it and was called chili mac so I had to add some.
Stovetop Chili Mac
1 lb. rigatoni pasta
1 tsp. olive oil
3 cloves of garlic, minced
1/2 medium yellow onion, chopped
1 lb. hamburger
1 Tbsp. chili powder
2 tsp. ground cumin
Salt and pepper
1 cup corn kernels
1 small zucchini, shredded
1 can (28. oz) fire roasted tomatoes
4 oz. cheddar cheese, grated

Directions:
  1. Cook the pasta according to the package directions.
  2. While the pasta is cooking, heat the oil in a large skillet over medium heat.
  3. Add the onion and garlic. Saute for about 3 minutes.
  4. Add the hamburger and increase the heat to medium high. Cook for 5 minutes while breaking up the meat.
  5. Add the cumin, chili powder, salt, and pepper. Stir until incorporated.
  6. Add the corn and zucchini. Cook for about 3 minutes.
  7. Add the can of tomatoes with juice to the pan. Stir well.
  8. Simmer the mixture for 5 minutes. Add additional seasonings if needed.
  9. In a serving dish, add the pasta and top with the meat mixture.
  10. Sprinkle the dish with cheese and serve.
Recipe adapted from Martha Stewart website.
 Did you already know...
-From Maine to Mississippi, it is roughly 1,700 miles.
-Six states make up New England. (Can you name them?)
-By traveling the most direct route to Mississipi from Maine, a driver while pass through 4 of the 6 New England States. (Do you know which two states a driver will not pass through unless they become lost?)

Monday, April 23, 2012

Oatmeal Crisps

When I first saw this recipe, I thought these would be like circular cookies. I actually like they are in bar form. These cookies are so good. I prefer oatmeal cookies with no chocolate so I did the same thing. The other thing I did was replace the corn syrup with agave syrup. It is a preference thing.
This week's pick for Project Pastry Queen was picked by Missy of Creative Missy. I will be making these crisps again. My husband would not stop eating them. I had to hide these four crisp to take a photo of them.

Oatmeal Crisps
1/2 cup butter, unsalted
1/2 cup brown sugar, packed
1 Tbsp agave syrup
 2 cups old-fashioned rolled oats
1 tsp baking powder

1/4 tsp salt
1/3 cup sweetened shredded coconut


2 cups old-fashioned rolled oats


Directions:
  1. Preheat oven to 350 degrees F.
  2. With cooking spray, grease a 9 x 13 inch pan.
  3. In a small saucepan, melt the butter, brown sugar, and agave syrup about 2 minutes or until mixture is smooth.
  4. Add the oats, baking powder, salt, and coconut. 
  5. Stir until all the ingredients are well incorporated.
  6. Press the ingredients evenly into the greased 9 x 13 pan.
  7. Bake the crisps for about 20 minutes.
  8. Remove and allow the mixture to cool for 20 minutes.
  9. In the pan, cut the crisps down the middle vertically. Then cut the crisps horizontally to make the crisps.
Recipe adapted from The Pastry Queen cookbook.

Did you already know...
- Corn syrup is a natural sweetener made from corn.
-Corn syrup and sugar have the same amount of calories.
-The USFDA list corn syrup safe to use in food since 1983.

Friday, April 20, 2012

Breakfast Bruschetta

Do you love brunches? I really do since I get to combine two meals in one. The best part is less dishes-most of the time. If we don't go out for Sunday breakfast, we will make breakfast. Sunday is the only day I will cook a big breakfast. On occasion, I can even talk my husband into cooking and dishes. It is the best way to start the day.
I think this would make the perfect special breakfast for someone. If some fruit is added with the perfect breakfast beverage, I think it would be pretty fancy and easy. It is a great way to use up some left over french bread.
Breakfast Bruschetta
3 eggs
2 egg whites
1 tsp milk
1 tsp butter
12 slices of french bread
1 tsp olive oil 
1/2 tsp oregano
1/2 tsp parsley
1/4 tsp rosemary
1/8 tsp garlic powder
1/8 tsp thyme

1 plum tomato, chopped
4 oz. cheddar cheese
salt and pepper for taste

Directions:
  1. In a medium bowl, add the eggs, egg whites, and milk. Whisk well until combined.
  2. In a cold medium skillet,  add the butter with the egg mixture. 
  3. Turn the stove to medium and whisk eggs slowly while heating up.
  4. Continue to cook the eggs until cooked through. Set aside.
  5. In a small bowl, mix the olive oil, oregano, parsley, rosemary, thyme, salt, and pepper. 
  6. Brush each top of the sliced french bread with the olive oil. 
  7. Toast the french bread in the toaster oven, oven, or grill.
  8. Fold the tomato into the eggs until incorporated.
  9. Add the egg mixture on top of the toasted bread.
  10. Top with cheese. Season with salt and pepper.
  11. Serve immediately.
Recipe adapted from Hungry Girl.

 Did you already know... 
-Brunch began in the late 1900s in England.
-Brunch is typically served between 10 am to 2 pm.
-Certain alcohol drinks are acceptable to be served at brunch.

Thursday, April 19, 2012

burrito

It is currently Spring Break for us so I have been away. We traveled down South where it was suppose to be warm. I think Mother Nature is playing games with me by allowing the weather to be warm for a day before turning cold. I think Mother Nature has a sense of humor since she must know I packed mostly shorts.
Maybe if I make something from the Tex-Mex region, the warm weather will return? I actually prefer burritos over tacos. Do you like tacos or burritos better? My husband would pick tacos.
Burrito
1 1/2 lb ground hamburger
1/2 onion, chopped
1 clove of garlic, chopped finely
1 jalapeno pepper, chopped finely
1 Tbsp chili pepper
1 tsp ground cumin
salt and pepper to taste
1/4 cup water
8 flour tortilla 
1 16oz. refried beans (optional)
8 oz. shredded cheddar cheese
toppings: cheese, sour cream, tomatoes, lettuce, etc.


Directions:
  1. Preheat the oven to 350 degrees F.
  2. Brown the hamburger in a skillet over medium heat for about 5 minutes. 
  3. Make sure to break up the meat well.
  4. Add the onion, garlic, and jalapeno pepper. Cook for 5 minutes.
  5. Add the chili pepper, cumin, salt and pepper over the meat and distribute the spices throughout the meat.
  6. Stir in the water and allow to simmer for about 5 minutes. Set aside.
  7. Working with one tortilla at a time, spread a layer of the refried beans over the tortilla if desired.
  8. Top with the hamburger mixture.
  9. Sprinkle some cheddar over the hamburger mixture and roll into the burrito shape.
  10. Lay the rolled burrito into a 9x13 baking dish with the seam side down.
  11. Continue to assemble the burritos one at a time.
  12. Bake the burritos for about 20 minutes. 
  13. Before serving, top each burrito with the desired topping.
Recipe by Jen of Sweet Morris.


Did you already know...
- A burrito is a tortilla folded over a type of filling.
-A Mexican burrito may have only one type of filling like meat.
-The American burrito tends to have a combination of fillings like rice, meat, beans, etc.
-There are even regional type of burritos like the San Francisco burrito.

Tuesday, April 17, 2012

Banana split cake

Did your Mom make banana pudding a lot when you were growing up? It was one of my favorite desserts as a kid. I loved the pudding with bananas and cookies.
I still like the dessert but I never think to make it. When I saw this recipe, it did remind me of the childhood dessert but revised. The original recipe calls for honey grahams but I had to go with the Nilla wafers.
Banana split "cake"
1 1/2 cups Nilla wafer cookies, crushed
1/8 cup sugar
1/3 cup butter, melted
2 packages (8oz.) cream cheese, softened
1 1/2 cup sugar
1 (20 oz.) can crushed pineapple in juice, drained
4 bananas, sliced thinly
2 packages (3.4 oz) vanilla flavor instant pudding
2 cups cold milk
2 cups Cool Whip Whipped Topping, thawed
2 bananas, for garnish

Directions:
  1. In a medium bowl, mix the cookies, sugar, and butter.
  2. Press the cookie mixture into a 13x9 or other desired pan. 
  3. Freeze for 10 minutes.
  4. In a large bowl, beat the cream cheese with the sugar.
  5. Carefully, spread the cream cheese mixture on top of the cookie layer.
  6. Top the cream cheese with the pineapple.
  7. Top the pineapple with the sliced bananas.
  8. Beat the pudding mixes and milk with a whisk for about two minutes.
  9. Fold in 1 cup of Cool Whip.
  10. Spread the pudding mixture on top of the banana layer.
  11. Top the pudding mixture with the remaining Cool Whip.
  12. Refrigerate for at least 5 hours or overnight.
  13. Before serving, top the dessert with slices of bananas.
Recipe slightly adapted from Food & Family Cookbook Best Loved: Quick & Easy Recipes page32.
Did you already know...
-Nilla wafers are made by Nabisco.
-In 2000, Kraft food acquired Nabisco. 
-Kraft food has over 100,000 employees worldwide.
-45% of the employees are women.

Sunday, April 15, 2012

Peanut Buttercup Cupcakes

My family loves peanut butter. So, I had to make this recipe. I really don't think I even had a choice. They are the best. I think if I made these everyday my family would not complain. Can you imagine the conversation: "What are we having for supper?" "PB cupcakes." Since I believe we can't just live off of PB and Penuche, I guess I'll make something else for supper tonight. I have already been asked to make these again. How can I say no?
When my Dad was growing up, he had a gigantic sweet tooth. As an adult, he hardly eats sweets. He would recommend this dessert. I took a photo of him with his cupcake but I am not allowed to post it. I made a peanut butter frosting and drizzled the peanut-penuche icing on top. Please make sure to checkout the other posting for this week at Project Pastry Queen.
Peanut Buttercup Cupcakes
1 3/4 cups all purpose flour
1 Tbsp baking powder
1/2 tsp salt
1 1/4 cup firmly packed dark brown sugar
6 Tbsp unsalted butter, room temperature
1/3 cup peanut butter 
1 cup milk
2 tsp vanilla extract
2 eggs
3.5 oz bar bittersweet chocolate, chopped fine or in chip form

Directions:
  1. Preheat oven to 350 degrees F. 
  2. Line cupcake liners into a muffin tin.
  3. In a mixing bowl, combine the flour, baking powder, salt, and sugar on medium speed for about 30 seconds.
  4. Add the butter, peanut butter, milk, and vanilla. Mix for 1 minute on medium-low speed.
  5. Add the eggs and beat for 90 seconds on medium-high speed.
  6. Fill the cupcake liners only 1/8 full with the cake batter.
  7. Add a few pieces chocolate pieces in the middle of each cake batter.
  8. Cover the chocolate and the batter reaches only half full in the cupcake liners. (If you add too much, the batter will overflow over the liners.) 
  9. Bake for 30 to 35 minutes or until the cupcakes are light brown and a toothpick stuck in the middle comes out with no crumbs on it.
  10. Allow the cupcakes to cool for 10 minutes before removing from pan.
  11. After removing from pan, allow the cupcakes to cool at least another 5 minutes before frosting.
Peanut-Penuche Icing
1/4 cup unsalted butter
1/4 cup peanut butter
1/4 cup milk
1 cup dark brown sugar, firmly packed
1/8 tsp salt
1 tsp vanilla extract
1/2 cup powdered sugar

Directions:
  1. In a medium saucepan, combine the butter, peanut butter, milk, brown sugar, and salt over medium heat.
  2. Bring the mixture to a low boil and cook for 90 seconds without stirring. Take the saucepan off the burner and allow to cool for only 30 minutes. 
  3. Add the vanilla and powdered sugar.
  4. Beat the mixture on medium speed until creamy about 1 minute.
  5. Frost the cupcakes with the Peanut Butter-Penuche Frosting.
  6. Drizzle the remaining Peanut-Penuche Icing over the cupcakes.
Recipe adapted from Pastry Queen Cookbook.

Peanut Butter-Penuche Frosting
1 tsp vanilla
8 oz butter, room temperature
3 cups powder sugar
1/4 cup peanut-penuche icing
1/4 cup peanut butter
1/4 cup milk

Directions: 
  1. In a large bowl, add the vanilla, butter, sugar, peanut-penuche icing, peanut butter, and milk.
  2. Mix the ingredients on medium speed. 
  3. If the frosting isn't the right consistency, add a little more milk or sugar until the desired consistency is reached.
  4. Frost immediately.
Recipe created by Jen of Sweet Morris.
Did you already know...........
-Penuche is a fudge like candy.
-July 22 is National Penuche Day.
-Penuche has been around since the late 1800s.
-Reese's Pieces have a peanut penuche filling.

Thursday, April 12, 2012

Sand dollar cookies

I can't wait to head to the beach. I will admit I do not go into the Maine water. Would you? It is just too cold for me. However, my children have no problem. I would rather look for sand dollars. If I find one, I may not be quick enough in grabbing it then I will be hit by a wave but normally I get lucky. I am like the little kids who run away when the wave comes near them.
 Last year, we were at the beach and a sea gull actually swooped down close. It was able to take my oldest daughter's sandwich right from her hand. She screamed so loud. I thought it was so funny. It didn't happen again since she was prepared. The rest of the visit she would just keep watching them. She would just keep scanning the sky. She wasn't going to fall for that again. It didn't help that my son was afraid of birds at the time.
These cookies taste very similar to a snickerdoodle cookie. 

Sand Tarts
1/2 cup unsalted butter, softened
2 cups sugar
2 eggs (1 egg needs to be separated)
1 1/2 tsp vanilla extract
1 tsp lemon zest, finely grated
2 1/2 cups all purpose flour, sifted
1/2 tsp salt
1 tsp water
2 tsp ground cinnamon
sliced almonds, for decoration

Directions:
  1. In a mixer, beat the butter on medium speed until creamy.
  2. Add 1 cup sugar and beat until fluffy.
  3. Add into the butter mixture 1 egg, 1 egg yolk, vanilla, and the lemon zest.
  4. Add the flour and salt to the butter mixture.
  5. Mix on low speed until the dough comes together.
  6. Shape the dough into a disk and wrap well in plastic wrap.
  7. Refrigerate the dough for at least 2 hours or overnight.
  8. Preheat the oven to 400 degrees F.
  9. In a small, whisk together the egg white and the water.
  10. In another small bowl, combine the sugar and 3/4 cup sugar.
  11. Roll out the dough on a clean, floured surface.
  12. With a round biscuit cutter, (glass or other round object) cut round circles in the dough.
  13. Place the circles of dough onto an ungreased baking sheet. 
  14. Brush the dough with the egg white water.
  15. Decorate each piece of dough with 3 almonds to look like sand dollars.
  16. Sprinkle each pieces of dough with the cinnamon sugar.
  17. Bake the cookies for 8 minutes or until golden brown. Rotate about 5 minutes of baking.
  18. Remove the cookies from the oven and transfer to a wire rack to cool completely.
Recipe adapted from Martha Stewart's Cookies.
Did you already know...
 -Sand dollars tend to live for 6 to 10 years.
-Sand dollars can move along the sand or burrow in the sand underwater.
-Live sand dollars can be found below the low tide depths of the ocean.

Wednesday, April 11, 2012

Bruschetta

Sometimes the simple appetizers tend to be the best. If I am spending a lot of time preparing the main course, I really don't have time to spend hours to make an appetizer. Why make an appetizer? Well, I really need something to hold the kids (boy) over until dinner is ready.
The best thing about bruschetta is it is just toast. I can even toast the french bread in the toaster oven which clears up even more space. I do recommend slicing your bread thinner than mine.
Bruschetta
1/8 cup of olive oil
2 tsp oregano
2 tsp parsley
1 tsp rosemary
1/8 tsp garlic powder
1/2 tsp thyme
salt and pepper to taste
 8 slices of french bread
1 tomato, sliced in cube pieces
8 leaves of basil, sliced
1/4 cup mozzarella cheese, sliced


Directions:
  1. In a small bowl, mix the olive oil, oregano, parsley, rosemary, thyme, salt, and pepper.
  2. Brush each top of the sliced french bread with the olive oil.
  3. Toast the french bread in the toaster oven, oven, or grill.
  4. Brush the cubed tomato pieces with some of the olive oil mixture.
  5. Mix the basil and tomato pieces together.
  6. Top each piece of the french bread with the tomato mixture.
  7. Sprinkle each slice with a little cheese before serving.
Recipe inspired by Quick Bruschetta for two in the Food & Family Cookbook best loved: quick & easy recipes. 
Did you already know...
- Bruschetta is an Italian antipasta or appetizer.
-Bruschetta is topped toast.
-Bruschetta is a great way for the growers to sample the quality of the newly pressed olive oil.

Tuesday, April 10, 2012

Asparagus

Since my son has been asking for asparagus again, I figured I would do a twist on this recipe. My son helped prepare the dish with me. He even recruited my oldest daughter to help. They did a pretty good job. 
I will admit I don't use puff pastry a lot. The kids like it and it is very versatile. It does look fancy doesn't it.
Asparagus Spirals
1 lb asparagus
1 tsp olive oil
1/4 lemon zest, grated
1 tsp dry thyme
1 sheet of puff pastry, thawed

  1. Preheat oven to 400 degrees.
  2. Take one stalk of asparagus and bend it in half until it snaps.
  3. Cut the other pieces of asparagus the same length as the snapped asparagus.
  4. Drizzle the olive oil over the asparagus.
  5. Add the lemon zest and thyme. Toss to coat the asparagus.
  6. Roll out the sheet of puff pastry.
  7. Cut the puff pastry hortizontally in 1/2 inch strips.
  8. Wrap the strips around each piece of asparagus.
  9. Cook the asparagus in a single layer on a baking sheet for about 15 or until golden brown.
Recipe aspired from the Pepperidge Farm website.
 Did you already know...
-In 1937, Margaret Rudkin began to experiment with making preservative-free bread because her son was allergic to the commercial breads ingredients. 
-Margaret Rudkin began to sell her bread to local grocers.
-She named her business Pepperidge Farm after her family's farm in Connecticut.

Monday, April 9, 2012

Margaritas

This week's Project Pastry Queen's pick was Guanabana Margaritas by Shawnda of Confections of a Foodie Bride. I looked in four different stores but it isn't popular in Maine. My Dad even suggested I look in the exotic fruit section of our local store but there wasn't much there this week. I couldn't find it so I decided to use guava nectar instead. 
I will admit that I thought I had never had a guanabana before. I was wrong. Over five years ago, my Mom gave me a box of exotic fruit that she received at work. My husband would not try anything in the box but my daughter and I did. I had to look up several fruits on how to eat it. The guanabana was labeled prickly custard apple. We liked it. 
 I will admit this is the first time I have made a Margarita. I invited my favorite person and my Mom to try it with me. They both said I did a good job. My husband decided to pass since tequila isn't his drink of choice. Since I purchased Margarita glasses for this occasion, I will have to try to experiment with other Margaritas. I guess I will be checking our Shawnda's blog more often.

Guava Margaritas
1 lime
1 lemon
3/4 cups Cuervo Gold tequila
3 Tbsp Grand Marnier
1 Tbsp powdered sugar
1 1/2 tsp sugar (optional)
1 (9.8 oz) guava nectar
1 cup crushed ice
coarse sea salt
lime and lemon zest spirals for garnish

Directions:
  1. Pour the salt on a small plate.
  2. Rub the edge of the Margarita glasses with a lime wedge.
  3. Dip the edge of the glasses in the course salt.
  4. Add the crushed ice to each glass.
  5. Squeeze the lime and lemon into a large cocktail shaker.
  6. Add the tequila, Grand Marnier, sugars, guava nectar, and crushed ice. 
  7. Put the top on securely.
  8. Shake, shake, shake!
  9. Pour the drinks through a stainer into each glass.
  10. Serve immediately.
Recipe adapted from The Pastry Queen. 
Tip: I purchased the Grand Marnier in nips. I didn't even use all of one nip for this recipe.
Coral is very fashionable this Spring!
 Did you already know...
- Guanabana fruit is also called soursop, prickly custard apple, and   
  Brazilian paw paw.
-The flesh and seeds are inedible.
-It tastes like a combination of a mango and a pineapple.

Friday, April 6, 2012

PQ: Tortilla Soup

After records highs, it is cold again. I know Spring isn't officially here since I haven't heard the peepers yet. To warm us up, I like to make soup. Also, the other great thing I noticed about soups are they normally taste great the next day. Guess what is for lunch tomorrow?
I had to adapt a few things since I could not find a dried ancho chile pepper. I asked several people at the store and there were none to be found. I just roasted a poblano chili in the oven. I looked in two different stores but there were none in stock. Maybe it isn't a popular item in Maine? Maybe it is a seasonal item here and I'll find it around Cinco de Maya? I still think the soup was awesome. (Awesome is a popular word in my house. It seems to be pronounced as ahhh some!. )
Texas Tortilla Soup
8 plum tomatoes
4 Tbsp olive oil
1 medium yellow onion, diced
6 cloves of garlic, minced
1 red bell pepper, diced
2 tsp chili powder
2 tsp ground cumin
4 cups chicken stock
 1 poblano chili, roasted and chopped.
1 (15 oz) can peeled tomatoes
2 chicken breast
1 (8oz) package frozen corn
Optional garnishes: avocados, tortilla chips, plum tomatoes, Monterey Jack cheese etc. 

Directions:
  1. Preheat oven to 350 degrees F. 
  2. Slice the tomatoes in half. 
  3. Coat a baking sheet with 1 Tbsp olive oil. 
  4. Arrange the tomatoes on top, skin side up. 
  5. Drizzle the tomatoes with another 1 Tbsp of olive oil. 
  6. Roast the tomatoes for 25 to 35 minutes. The tomatoes should have wrinkled skin and slightly brown around the edges. Set aside.
  7. In a large pot, heat 2 Tbsp olive oil over medium heat. 
  8. Add the onion, garlic, and bell pepper. Saute for about 5 minutes.
  9. Stir in the chili powder and cumin. Cook for 1 minute.
  10. Add the chicken stock and the roasted poblano chili.
  11. Bring the soup to a boil over medium high heat. 
  12. Cover and simmer for about 15 minutes.
  13. In a food processor, add the tomatoes and puree for about 1 minute.
  14. Transferred the pureed tomatoes to the soup and stir.
  15. Cover and allow to simmer for 30 minutes.
  16. Add the chicken breast to the soup. Cover and allow to simmer for another 30 minutes. 
  17. Remove the chicken and shred the meat or cut into small pieces. 
  18. Return the chicken to the pot. 
  19. Add the frozen corn and stir. Allow the soup to cook for an additional 5 minutes or until the chicken is cooked thoroughly.
  20. Ladle the soup into serving bowls and garnish with desired toppings. 
  21. Serve immediately. 
Recipe adapted from The Pastry Queen Cookbook. Check out the Project Pastry Queen for other members soup postings.This was Amanda's pick back in January.
Did you already know...........
-Ancho chili is a dried poblano chili.
-In Spanish, ancho means width.
-Some substitutes for the ancho chili are: mulato, pasillo, or ground ancho chili powder

Thursday, April 5, 2012

Mango Strawberry Muffins

My son's latest amusement is to try to have both of his eyebrows touch. He hasn't succeed yet. I don't know where he got this idea from but it is funny to watch. I don't know if someone dared him to do it but it has kept him occupied for awhile now. After you try, let me know if you can do it. Unibrows do not count.
I decided to put mango and strawberries together in a muffin. I wasn't sure how it would come out but the kids liked it. These muffins are dense but moist. I liked the combination. I probably will not top the muffins with a slice of strawberry next time since it did make the top sink a little.
Mango Strawberry Muffins
1 ripe mango, cup up
1 Tbsp lemon zest
3 Tbsp lemon juice
1/2 cup milk
1/4 cup strawberry yogurt
6 Tbsp unsalted butter, melted and slightly cooled
1 egg
2 1/2 cups all purpose flour
1/2 cup sugar
3/4 Tbsp balking powder
1/4 tsp salt
1 cup strawberries, chopped

Directions:
  1. Preheat the oven to 350 degrees F.
  2. Line a 12 cup muffin tin with cupcake liners.
  3. Add the mango, lemon zest, and lemon juice to a food processor.
  4. Pulse for about 30 seconds.
  5. In a medium bowl, combine the mango mixture with milk, yogurt, butter, and egg.
  6. In a larger bowl, combine the flour, sugar, baking powder, and salt.
  7. Add the mango mixture to the flour combination. Stir until incorporated.
  8. Fold in the chopped strawberries.
  9. Fill the lined muffin tins with 3/4 of the batter.
  10. Bake the muffins for 35 minutes or until a toothpick inserted in the middle comes out clean.
  11. Allow the muffins to cool for about 5 minutes.
Recipe really adapted from The Pastry Queen cookbook.
Did you already know....
-Mango is the national fruit of India.
-A mango is rich in Vitamins A, C, and D.
-The skin of the mango is not edible. 
-The mango is part of the cashew family.

Tuesday, April 3, 2012

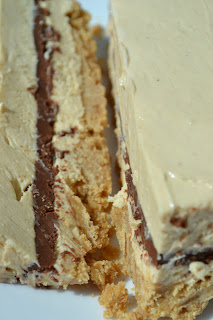
Chocolate and Peanut Butter Ribbon Dessert

My husband loves peanut butter. He also loves watching this show in which storage units are auctioned off. My oldest daughter loves the show too. As for me, I would rather blog. My son does not mind watching the show but he really hates the sound of the auctioneer's voice. He has to leave the room. I guess my son will not be pursuing the dream of being an auctioneer one day. 
 Since my husband loves peanut butter, I knew this dessert would be ideal for him. I guessed right. When my oldest daughter tried it, she said, "Whoa! This is great!" I would recommend this easy dessert.
Chocolate & Peanut Butter Ribbon Dessert
12 Nutter Butter cookies, crushed finely
2 Tbsp butter, melted
1 (8 oz.) package of reduced fat cream cheese, softened
3/4 cup creamy peanut butter
1/2 cup sugar
2 tsp vanilla
1 (12 oz.) container Cool Whip whipped topping, thawed
2 oz. semi sweet chocolate, melted

Directions:
  1. Mix the crushed Nutter Butter cookies with the melted butter.
  2. Press the mixture into the bottom of a parchment lined 9x5 loaf pan.
  3. In a bowl, mix the cream cheese, peanut butter, sugar, and vanilla until well incorporated.
  4. Whisk in 3 cups of the Cool Whip into the cream cheese mixture. 
  5. Remove 1/2 cup of the cream cheese mixture and place in a small bowl.
  6. Add the melted chocolate in the small bowl and mix well. Set aside.
  7. Spoon half of the cream cheese mixture over the pressed Nutter Butter cookies in the loaf pan. Spread evenly.
  8. Add the chocolate cream cheese mixture into the loaf pan. Spread evenly over the cream cheese mixture.
  9. Add the remaining cream cheese mixture on top of the chocolate cream cheese mixture.
  10. Place the loaf pan in the freezer for at least 4 hours or overnight.
  11. When ready to serve, invert the dessert onto a plate. Remove the parchment paper and reinvert the dessert onto a serving platter. 
  12. Add the remaining Cool Whip on top of the dessert with additional crushed cookies, if desired.
Recipe adapted from Kraft Foods Food and Family Cookbook.

Did you already know....
-In the State of Maine, an auctioneer must pass an examine to receive an auctioneer license.
-The auctioneer license must be renewed yearly.
-The auctioneer must have a surety bond for $10,000.