Tuesday, May 22, 2012

Olive Garden Salad

If you ask my youngest daughter what her favorite restaurant is, she will reply the Olive Garden. Sometimes when I make an Italian meal, she will pretend to be the waitress. I will tell her the menu and she will take everyone's order. She even carries around a pen and paper. The only person to give her a hard time is my husband. He will tell her he doesn't want what is on the menu and ask for crazy items. She will inform him that she is going to go talk to the chef about this. At first, he will reply that he doesn't care. When she starts to walk away, he calls her back and tells her he is afraid of the chef. 
 I have made this salad dressing a lot of times. It is suppose to be a copy cat recipe for the Olive Garden Salad dressing. I think it actually taste better and my family likes it a lot. When I first made this recipe, I misread the amount for the parsley. It should have been 1/2 tsp but I added a lot more. I like the looks of the dressing with the additional parsley so I have kept it.
Copy Cat Olive Garden Salad Dressing
3/4 cup mayonnaise
1/3 cup white vinegar
1 tsp vegetable oil
2 Tbsp agave syrup
4 Tbsp Parmesan cheese
1 clove garlic, minced
1/2 tsp Italian seasoning

1/4 cup parsley flakes
1 Tbsp lemon juice

1/4 tsp of salt
pinch of pepper

Directions:
  1. Add all the ingredients in a bowl or a mason jar.
  2. Mix the ingredients well until all incorporated.
  3. Serve the dressing over salad.
Recipe adapted from Jamie Cooks It Up!.

Our salad included Romaine lettuce, cup of baby spinach leaves, plum tomatoes, croutons, and mushrooms.
Did you already know...
-Parsley belongs to the same family as dill, celery, and carrots.
-Italian parsley is flat leaf parsley.
-Parsley is rich in Vitamin A, C, and K.
-Parsley is a natural breath freshener.

Monday, May 21, 2012

Baguette Bread

Oh, I love baguette bread. Since I made lasagna this weekend, I figured I would make up some bread to go with it. I actually made the dough the night before and refrigerated it until I was ready for the second rise.
The crust was crisp with a soft inside. This bread accompanied the lasagna nicely. The left over bread we placed in the freezer to make some croutons at another date. Next time, I'm going to knead some herbs into the dough before baking.
The Almost No Knead Baguette
3 cups lukewarm water
5 cups all purpose flour
3 cups white whole wheat flour
1 Tbsp salt
1 Tbsp instant yeast

Directions:
  1. Spray a large bowl with cooking spray and set aside.
  2. In another large bowl, add the water and yeast. Allow to rest for 5 minutes to make sure the yeast proofs.
  3. Add the flour and salt to the yeast water and stir to combine. 
  4. Mix the dough until no dry spots remain and the dough is fairly soft.
  5. Knead the dough by hand for a few minutes. The dough will be sticky.
  6. Add the dough to the greased large bowl and flip.
  7. Cover with plastic wrap and refrigerate overnight.
  8. Divide the dough in half and shape into a slightly flatten oval. 
  9. Fold the dough lengthwise in half. 
  10. Seal the edges of the dough with the heel of your hand.
  11. Flatten the dough slightly and fold in half lengthwise. Seal the dough with the heel of your hand.
  12. With the seam side down, gently roll the dough into desired size.
  13. Place the dough seam down on a lightly greased of a baking sheet or a baguette pan.
  14. Roll out the other half of the dough.
  15. Cover the dough and allow the dough to rise for about 1 1/2 hours.
  16. When ready to bake, heat the oven to 450 degrees F.
  17. Slash three or four times onto the baguette diagonal.
  18. Spritz the dough with warm water and bake for about 25 minutes or deep golden brown. 
  19. Remove the bread from the oven and allow to cool.
Recipe adapted from King Arthur website.
Did you know...
-The bakers of Vienna invented the steam ovens and were the first to begin to bake hard crusty breads.
-In France around 1920, a law went into affect that did not allow bakers to begin work before 4 am. The bakers needed a bread for their customers. Since the baguette baked faster, the baguette bread became popular with bakeries.

Sunday, May 20, 2012

Texas Pralines

When I tasted these candies, I knew I've had them before. They were creamy and delicious. This recipe was picked by Shawnda from Confections of a foodie bride for The Project Pastry Queen. I will say I love The Pastry Queen Cookbook but the cookbook doesn't always have pictures. My oldest daughter helped me drop the candy onto the waxed paper. I said to her, "Do you think this is how they are suppose to look?" She wasn't sure so I went and goggled images of Pralines. I had done it correctly and then I saw some chocolate covered Pralines. I took a few of the candies when they had cooled slightly and formed them into squares. Then I just dipped them into melted chocolate. These candies are great without the chocolate but the chocolate make them oh so much better.
 I have been giving these candies away to anyone who has been over to visit. My Dad just stopped by and I offered him one. After some, coaxing he said he would try one but only one. I saw him take two more. I offered him one of the chocolate covered ones and he preferred them without the chocolate. My husband who is not a fan of nuts liked them a lot. The majority liked them with the chocolate. Besides adding chocolate to a few of the candies, I substituted the corn syrup with agave syrup. (My grocery store sells agave syrup in the baking aisle. I purchased my pecans from the whole food bins in the grocery store since it is cheaper then purchasing them in the prepackaged bags.)
Texas Pralines
1 cup buttermilk
1 tsp baking soda
3 cups sugar
2 Tbsp agave syrup
1/4 cup unsalted butter
2 Tbsp vanilla extract
 2 1/2 cups whole pecans, toasted
(chocolate, melted if desired)

Directions:
  1. In a 4 quart pot, combine the buttermilk, baking soda, sugar, agave syrup, and butter.
  2. Cook slowly over medium heat. Stir occasionally.
  3. Cook until the mixture reaches between 234 and 240 degrees F.
  4. Remove the pot from the heat.
  5. Add the vanilla and pecans.
  6. Using a mixer, beat the candy for about 3 minutes or until the candy starts to lose its shine and starts to become creamy.
  7. Drop the candy by the tablespoon onto wax paper.
  8. Allow the candies to cool thoroughly before wrapping them individually in plastic wrap or dipping in chocolate.
Recipe adapted from The Pastry Queen.
 Did you already know...
- French Pralines have almonds in them.
-The French settles in Louisiana substituted the almonds with pecans.
-The American Pralines are softer than the European versions.

Friday, May 18, 2012

Taco Seasoning

Do you prefer crunchy tacos or soft tacos? Growing up, we had tacos often. My parents always bought the crunchy shells. Since my husband does not like the crunchy shells, I normally serve soft tacos. The kids just love tacos and they don't care if their shells are crunchy or soft. The best thing about tacos is my oldest daughter will volunteer to make them. It is a food we do not order out but make at home often. (Pizza however is a different story.)
I use to buy the taco seasoning and use half. The packet seemed high in sodium. I have purchased the lower sodium packets and they taste fine. Then last year I saw a blog about making your own taco seasoning. I thought it was the coolest idea and have not purchased the packets again. I make up a batch of the homemade seasoning and store it in my spice cabinet. I prefer the taste and none of the kids have made any comment about noticing a difference. I guess tacos are tacos. It is also a great way to use your spices. I did change it a little since I prefer chili powder to cumin but adapt it to your taste.
Taco Seasoning
5 Tbsp. chili powder
3 Tbsp. paprika
2 Tbsp. ground cumin
1 Tbsp. onion powder
1 Tbsp garlic powder
1/2 tsp cayenne pepper

1/8 tsp ground pepper

Directions:
  1. Mix the spices together and store in an air tight container until ready to use.
  2. When ready to use, brown the hamburger or chicken.
  3. Add 3 Tbsp of taco seasoning with 1 cup of water.
  4. Allow the meat to simmer for about 10 minutes.
  5. Add salt and pepper to taste.
  6. Serve with soft or crunchy shells.
Recipe adapted from Annie's Eats and Use Real Butter.

Did you already know...
-Taco Bell is named after the founder Glen Bell.
-In 1962, Mr. Bell opened the first Taco Bell in Downey, California.
-In 1978, Pepsi purchased Taco Bell.

Tuesday, May 15, 2012

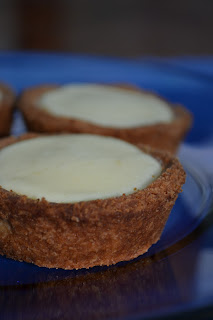
Lemon Tassies

I hope everyone had a nice weekend. We saw my husband's Mom and my Mom this past weekend. We are fortunate because we do see both Moms frequently. I wanted to make my Mom and my husband's Mom a special treat. I knew they liked lemon desserts so I decided to make Lemon Tassies cookies.
Sometimes when I make a lemon dessert, they are too sweet or too sour. I think these were the right combination. The other nice thing about these cookies are they transport easily. I even stacked them and it didn't affect the filling. Next time, I may use the left over egg whites to make meringue to top the cookies. This recipe will make about 12 medium size cookies or 24 mini cookies. I actually made 18 cookies.
Lemon Tassies
Crust:
2 cups all purpose flour
10 Tbsp cold unsalted butter, cut into cubes
1/4 cup and 2 Tbsp sugar
2 egg yolks
1/2 tsp vanilla extract
2 tsp lemon zest, finely grated
1/2 tsp salt
cooking spray
Filling (recipe below)

Directions:
  1. Preheat oven to 350 degrees F.
  2. Coat 1 muffin tins with cooking spray.
  3. In a food processor, process the flour and butter until fine crumbs.
  4. Add the sugar, egg yolks, vanilla, lemon zest, and salt.
  5. Process until just combined and sandy in texture. Do not over process.
  6. With the dough, form 12 balls.
  7. Place each ball into the muffin tin and press the dough into the tin to make a cup.
  8. Bake the crusts for about 8 minutes and then rotate the pan.
  9. Bake the crust for another 8 minutes or until lightly browned all over.
  10. Remove the crusts from the muffin tins and allow to cool onto a wire rack.
Filling:
8 oz. cream cheese, room temperature
1/2 cup sugar
1 egg
3 Tbsp lemon zest, finely grated
1 Tbsp fresh lemon juice
1/2 tsp vanilla extract

Directions:
  1. Beat the cream cheese, sugar, egg, lemon zest, lemon juice, and vanilla extract together until smooth.
  2. Fill each cooled crust with the cream cheese filling.
  3. Place the cookies onto a cookie sheet.
  4. Bake the cookies for 6 minutes and rotate the pan.
  5. Bake the cookies for another 6 minutes or until the edges of the filling begin to color.
  6. Transfer the cookies onto a wire rack to cool completely.
Recipe adapted from Martha Stewart's Cookies.
Did you already know....
-Tassies are little cups with a filling.
-Tassies should be bite size.
-Other fillings for a tassie are pecan, peanut butter, caramel, etc.