Friday, May 11, 2012

Fresa Agua Fresca

Several years ago, I had a family portrait done of us. I keep it on the computer as the wallpaper. My youngest son wanted to us the computer but could not connect online. While he waited, he leaned forward to study the photo. He said to me, "Boy, do I look young." I started to laugh and I replied, "Son, you are young." My seven year leans forward and says so kindly, "Alright, boy do you guys look young." Thanks Son!
 As you can guess, I will be having an entertaining weekend with my son and family. Sunday is suppose to be beautiful. Tomorrow, I will visit my wonderful Mom. Then next day, I will be relaxing! (I have to take advantage of this since the only other day I am pampered is my birthday!) I wish you a Happy Mother's Day weekend too! If you are planning to make a meal for your Mom, I highly recommend this drink. If your Mom doesn't like strawberries, you can try maybe blueberries and lemons. If your Mom likes some rum, it would be a nice addition. The kids couldn't get enough of this drink. The pitcher was gone within minutes. I have already said this is a must on our menu for the picnic. 
Fresh Strawberry Water Drink
2 cups water
15 oz. bag of frozen strawberries, unthawed
2 limes
1/4 cup sugar

Directions:
  1. In a blender, add the water and strawberries.
  2. Process until smooth.
  3. Squeeze the juice of the two limes into the strawberry mixture.
  4. Add the sugar to the desired sweetness.
  5. Blend well and drink!
Recipe adapted from Myrecipes website.
Did you already know....
 -Fresca is the Spanish word for fresh.
-Agua is the Spanish word for water.
- Fresa is the Spanish word for strawberries. It also is a slang word for a preppy person.
She is making faces in the background!
Happy Mother's Day!

Thursday, May 10, 2012

Adaptable recipes

Do you ever see a recipe that catches your eye but when you read the ingredients you think maybe not? When I saw the Triple Cheese Bread recipe on the back of the King Arthur flour, I thought this recipe was made for me. Then I read the ingredients and saw cottage cheese. My Mom loves cottage cheese. My sister loves cottage cheese. Even my history professor loved cottage cheese so much that she ate it every day for lunch. Why she would choose to eat the same thing every day was the bigger question? Maybe since you can't change history so why change lunch? I will never know.
As you probably guess, I am not the biggest advocate of cottage cheese. I do like ricotta cheese so I decided to adapt it to my liking. I am really glad I did since this bread was so good. I also needed something quick for supper so I decided to make the rolls into sliders. My husband and son had turkey sliders. They liked it. I prefer ham and cheese. They were good. These rolls would even had been good with roasted vegetable sliders. These rolls would be perfect for a picnic with mom.
Can you see the cheese in the bread?
Seven Cheese Bread
6 oz. warm water
1 package of yeast
2 Tbsp sugar
3 1/2 cups all purpose flour
1 1/2 tsp salt
2 Tbsp unsalted butter, room temperature
3/4 cups ricotta cheese
1/2 cup sharp cheddar cheese, shredded
1/4 cup of five cheese Italian blend


Directions:
  1. In a cup, add the water and sugar.
  2. Add the yeast and allow to dissolve. Set aside.
  3. In a large bowl, combine the flour, salt, and butter.
  4. Add the yeast water and the cheeses.
  5. Mix until the dough comes together.
  6. Place the dough onto a clean surface that has been dusted with flour.
  7. Knead the dough for 10 minutes.
  8. Whip down the large bowl and spray with cooking spray.
  9. Add the dough to the bowl and flip it.
  10. Cover the dough with plastic wrap and spray the plastic with cooking spray. Then flip the plastic over so the sprayed side is facing down towards the dough.
  11. Allow the dough to rise for about an hour. (I allowed it to rise for 5 hours and it was fine.)
  12. Punch the dough down and divide into about 12 pieces. (I made 13 pieces since I didn't want the rolls so big.)
  13. Place the dough pieces onto a sprayed cookie sheet.
  14. Allow the dough to rise for 20 minutes.
  15. Turn on the oven to 350 degrees F.
  16. Place the dough into oven and cook for 20 minutes or until the rolls are done. (I didn't want to wait so the oven had only reached 100 degrees F and I cooked the rolls for 25 minutes. They came out perfect and not doughy but I had made 13 rolls.)
  17. Serve immediately or allow to cool
 Recipe adapted from a King Arthur bread recipe.
Did you already know...
-The oldest flour company in America is King Arthur.
-The company was formed in 1790 by Henry Wood.
- Henry Wood began the business in Boston by importing flour from Europe.
-Since 1896, King Arthur flour has been domestically grown.
His smile is great!

Tuesday, May 8, 2012

Pizza Sauce

My husband has been doing a dangerous thing lately. He has been doing some grocery shopping. Since he is hungry, he has been buying the frozen french bread pizzas. So, I caught him eating them. I asked him what he was doing. He claims he was hungry and needed something. Since he is a smart man, he said he knows mine do taste a lot better but I didn't have any in the freezer ready to eat.
To make your own frozen french bread pizza is easy. I take a french bread and cut it close to the edge. I also cut the other side closer to the edge if I'm going to freeze it. The middle section my children eat but you could make croutons. On each inside of the bread, I slather on the pizza sauce and toppings. Then I just wrap it tightly and freeze. I have sometimes cooked the pizza half way through before the cheese becomes bubbly and allow to cool before freezing. When ready to eat, I place it on a baking sheet. I preheat the oven to 400 degrees F and cook the pizza for about 20 minutes or until the pizza is cooked through.
Pizza Sauce
2 Tbsp olive oil
3 cloves of garlic, crushed
1 (28 oz.) can tomato puree
1 tsp dried marjoram
1 tsp dried basil
2 tsp dried oregano
1 bay leaf 
salt and pepper, to taste

Directions:
  1. In a saucepan, heat the oil over medium heat.
  2. Add the garlic and heat for a minute.
  3. Add the remaining ingredients.
  4. Cover and bring the sauce to a boil.
  5. Uncover and lower the heat to simmer.
  6. Simmer for 30 minutes.
Recipe adapted from Tyler Florence.
Doesn't this look better than store bought?
Did you already know...
-Stouffer's started in 1922 by Abraham and Mahala Stouffer.
-They started with a dairy stand and later opened restaurants.
-In 1950s, they expanded their business to include frozen meals.
-Stouffer's is now owned by Nestle USA with sales over $1 billion.

Monday, May 7, 2012

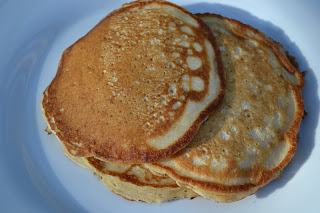
Pancakes

Alright, Mother's Day is less than a week away. Can you tell I'm a little excited? There are only two days of the whole year that everyone in the household takes care of me. I do not take advantage of these two days. I do not act like a diva and say please provide me with a small bowl of green M&Ms only. I do not go crazy but it is nice to feel appreciated. Now if only it doesn't rain and then the picnic will be fun. 
 I will admit my husband is very sweet and makes me breakfast on Mother's Day. He makes the best french toast. Since I knew we will be having french toast next week, I decided to make some pancakes. I frequently look at The Pastry Queen cookbook. There are so many recipes I want to try that The Project Pastry Queen have posted before I joined. When I saw Mother's Day Pancakes, I had to try them. It does say Mother's Day. 
 This recipe made enough for 5 people with plenty of left over. I made little silver dollars and then froze them. When you want to make them, you just pop them in the toaster oven and toast them. My youngest daughter checks making them. Yes, she liked them that much.
Mother's Day Pancakes
2 eggs
3 1/2 cups buttermilk
1 tsp baking soda
3 1/4 cups all purpose flour
2 tsp baking powder
1 tsp salt
2 tsp sugar
1/4 cup unsalted butter, melted
1 tsp vanilla extract
1 Tbsp vegetable oil

Directions:
  1. Whisk together the eggs and buttermilk in a large bowl. 
  2. Whisk in the baking soda until combined.
  3. Add the flour, baking powder, salt, and sugar. Whisk until incorporated.
  4. Stir in the melted butter and vanilla.
  5. Heat a frying pan over medium heat.
  6. Add a little oil to the pan and wait about 30 seconds.
  7. Pour 1/2 cup of the batter into the frying pan.
  8. When bubbles form on top of the pancake, flip the pancake over.
  9. Cook the pancake until the bottom is golden brown.
  10. Serve immediately with maple syrup or sugar.
Recipe adapted from The Pastry Queen.
Did you already know...
-It takes roughly 40 gallons of sap from the maple tree to make 1 gallon of maple syrup.
-It does no permanent damage to a maple tree and only 10 percent of the trees sap is collected per a year.
-The maple syrup tapping season tends to last only 8 to 10 weeks.
Now you know why it is so expensive.

Sunday, May 6, 2012

Dulce de Leche Arborio Rice Pudding

Sometimes you make something and it comes out so good that you are surprised. This dish surprised me. I have only had rice pudding with raisins in it. So, I thought I wasn't a big fan. I loved this dish. I think this may become a staple on my Thanksgiving meal. My family liked it too.
 The rice pudding was picked by Emily of Ruf Love for The Pastry Queen Project. My youngest daughter loved the Dulce de Leche. I am lucky I had enough for this recipe. She kept trying to sneak some. She also informed everyone else in the house how great it tasted and they should try it. I had to hide it so I could use it for this recipe. I did leave out the vanilla and amaretto liqueur and still thought this recipe was wonderful. I did keep rinsing out my medium saucepan to reuse so I could save on dishes. I think saving on dishes is my ultimate domestic goal. If I only had a family member who loved to do dishes, but as of this date I have had no volunteers.
Dulce de Leche- Arborio Rice Pudding
1 (14 oz.) can sweetened condensed milk
1/2 cup Arborio rice
2 cups water
1 1/2 cups low fat milk
4 large egg yolks
1/4 cup brown sugar, firmly packed
1 1/2 cups heavy cream
1 cup toasted slivered almonds, for garnish
1 cup chilled heavy cream
1/3 cup dulce de leche

Directions:
To make the dulce de leche:
  1. Take the paper wrapper from the can of condensed milk. Make sure all the glue is removed.
  2. Puncture two small holes on the opposite sides of the top of the can with a can opener.
  3. Place the condensed milk can in a medium saucepan.
  4. Fill the saucepan with water until the water reaches 2/3 of the way up the side of the can.
  5. Cover the saucepan and bring the water to a boil over high heat.
  6. Lower the heat so the water simmers. Simmer for 1 hour.
  7. Check on the water content to ensure the water level is above the 1/2 mark. Some of the milk will seep out of the holes in the can but it is fine.
  8. The condensed milk has become dulce de leche when the milk has turned a golden brown.
  9. Remove the can from the simmering water with tongs very carefully. 
  10. Allow to cool slightly and open with a can opener.
To make the rice pudding:
  1. Coat 6( 4 oz.) ramekins with cooking spray or a 6 cup ovenproof casserole dish.
  2. In a medium saucepan, bring the rice and water to a boil.
  3. Allow the rice and water to simmer for 5 minutes.
  4. Drain the rice in a colander and pour back into the saucepan.
  5. Add the low fat milk to the rice.
  6. Cover and simmer the rice for 20 minutes or until the milk is absorbed.
  7. Transfer the rice to a bowl.
  8. Preheat the oven to 325 degrees F.
  9. In a heat proof medium bowl, whisk the egg yolks and brown sugar together until smooth.
  10. In a medium saucepan, bring the heavy cream and 1 cup dulce de leche to a boil over medium heat.  Remove the saucepan from the heat.
  11. With a second person/mixer, begin to whisk the egg mixture vigorously. Add 2 Tbsp. of the hot cream mixture to the continuously whisked egg mixture. Continue to whisk for a few seconds.
  12. Slowly, pour the rest of the cream into the egg mixture while whisking continuously.
  13. Add the cooked rice and mix to incorporate.
  14. Pour the rice mixture into the prepared casserole dishes. 
  15. Bake for 45 minutes or until the top is browned. A toothpick should come out clean if it is stuck in the middle of the dish.
  16. While the rice pudding is cooking, make the whip cream.
  17. Add the heavy cream to a large bowl. Whisk the heavy cream until soft peaks form.
  18. Add 1/3 cup dulce de leche into the heavy cream. Beat until incorporated.
  19. Serve the rice pudding warm or room temperature. Top each serving with toasted almonds and whip cream if desired. 
Recipe slightly adapted from The Pastry Queen.
 Did you already know...
- Dulce de leche translates into sweet of milk.
-It is very popular in South America.
-Some versions use goat milk or unsweetened coconut milk to make dulce de leche.