My kids and my sister love Oreos. So, they really love cookies and cream ice cream. When my sister saw this recipe, she pinned it to me so I could make it for her. It came out really good. My sister was very happy. Cheesecake isn't really hard to make. It is time consuming. I did a water bath. Here is a great link to show you exactly what to do: youtube. However, I only used a little bit of water and I knew better. My cheesecake only cracked slightly. It didn't matter since I had planned to top it with whip cream and additional cookie crumbs. Anyone that loves cookies and cream plus cheesecake will love this recipe. My sister loved it and so did my daughter.
Oreo Cheesecake
Crust:
24 Oreo cookies, finely chopped (2 sleeves of the Oreo package)
3 Tbsp butter, melted
pinch of salt
Filling:
3 (8 oz.) packages light cream cheese, softened
2/3 cup sugar
5 large eggs
1/4 tsp salt
2 tsp vanilla extract
3/4 cup light sour cream
6 Oreo cookies, coarsely chopped
Garnish: miniature Oreo cookies, whip cream, and finely chopped Oreo
Directions:
Crust:
- Preheat oven to 325 degrees F.
- Line the bottom of a springform pan with parchment paper.
- Spray the springform pan with nonstick baking spray.
- Double line the outside of the springform pan with aluminum foil.
- Place the springform pan in the center of a broiler pan.
- In a medium bowl, combine the crushed Oreos with the melted butter and salt.
- Press the mixture into a springform pan. Set aside.
Filling:
- In a large bowl, mix the cream cheese until fluffy.
- Gradually, add the sugar. Mix until incorporated. Scrap down the sides.
- Add one egg at a time. Mix until incorporated. Scrap down the sides before adding the next egg.
- Add the salt, vanilla extract, and sour cream. Mix until well incorporated and smooth.
- Gently, fold in the chopped Oreos.
- Pour the filling into the crust.
- Carefully add hot water to the broiler pan. Make sure no water splashes onto the filling.
- Bake the cheesecake for 1 hour in the oven. The center should only be slightly jiggly.
- Shut off the oven but leave the cheesecake in the oven with the oven door only slightly ajar.
- Leave the the cheesecake in the shut off oven for 1 hour.
- Remove from the oven and refrigerate overnight before serving.
- Garnish the cheesecake as desired.
Recipe adapted from Cooking Pinterest.
One year ago.....................I made Stuffed Pork Chops.
Two years ago...................I made Zucchini Fries.
Did you already know.....................
- A springform pan is a cake pan with removeable sides.
-Springform pans come in many different shapes including heart shape and square.
-A springform pan may be initially waterproof but over time the clasp may weaken so always wrap the pan if using a water bath.
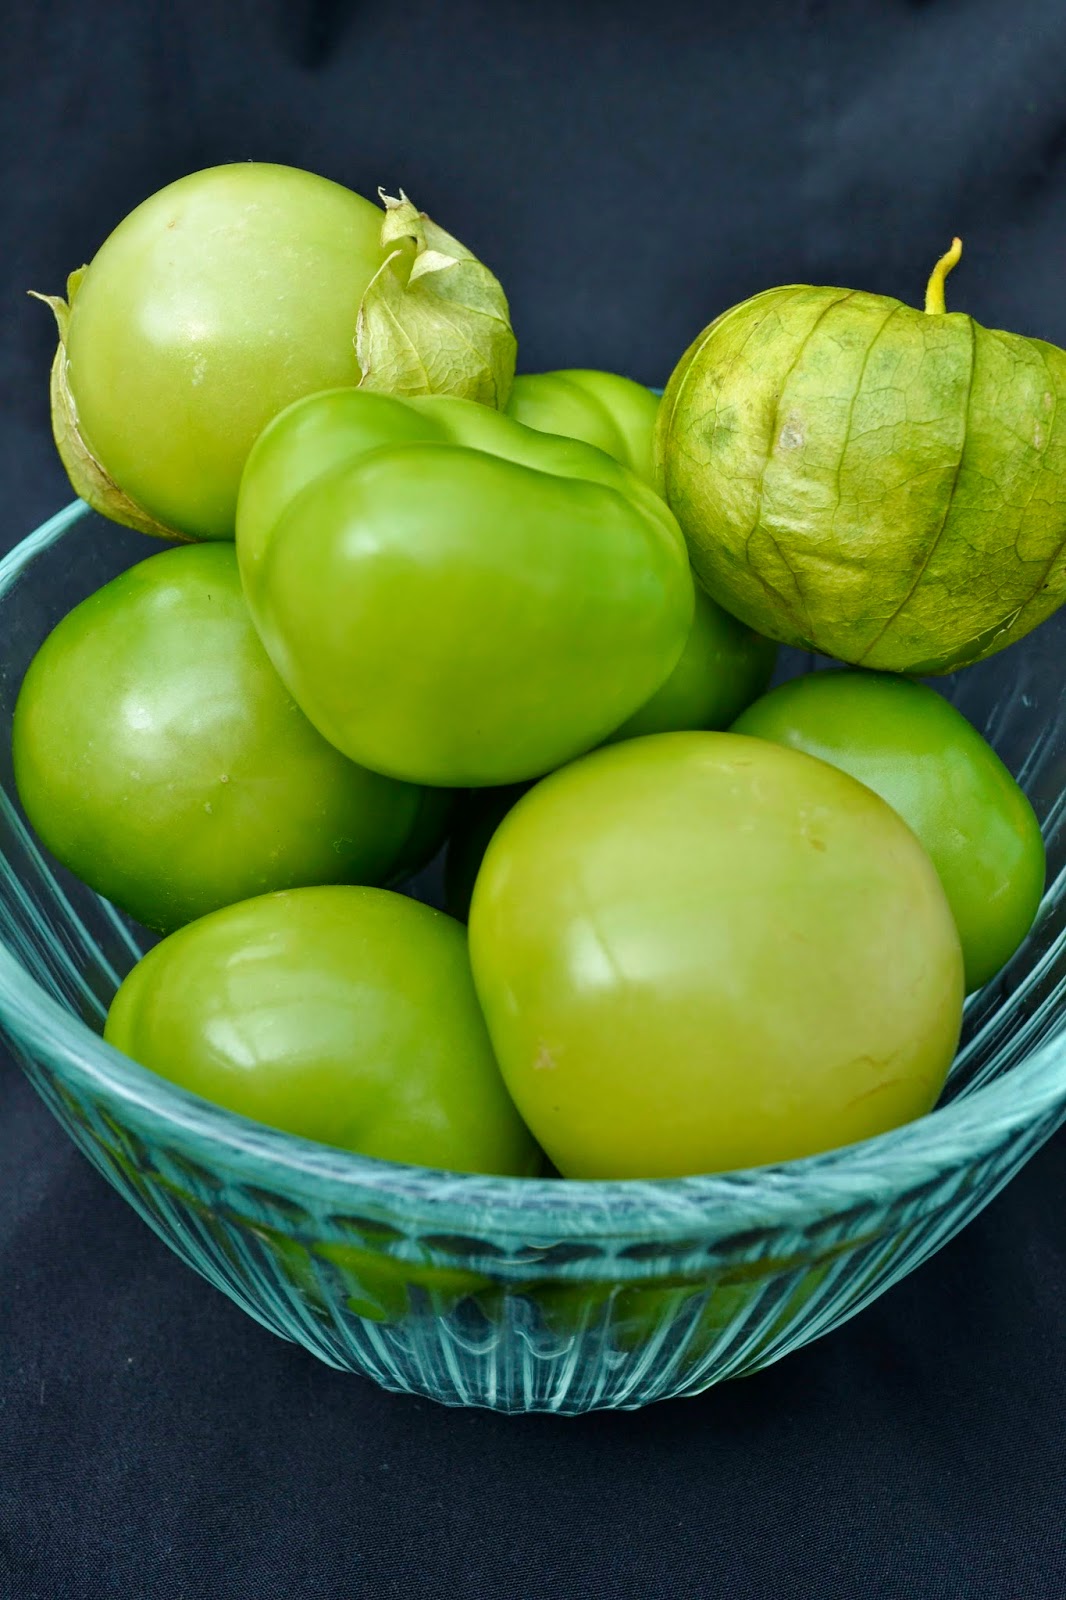
Sometimes I am intimated by new foods. How do you know it is ripe? Do you peel it or keep the skin on? Well, I've seen recipes for tomatillos but I have skipped them. The recipes said to husk them. When I think of husking, I'm thinking corn. Tomatillos look nothing like corn. At the farm, they educated me about tomatillos. I explained it to my sister since she picks up a share too. Then I figured maybe more people are like me and just need a little more information.
Ripe: When the paper thin coating is peeling, then the tomatillos is ripe. It is nice since you can see the fruit inside the wrapping. The fruit should be firm and bright green.
Prep: Peel off any paper thin coating and rinse. The fruit is sticky. I noticed the fruit was less sticky where the paper thin coating (husk) had peeled up. The paper thin coating is not edible.
Tomatillos can be eaten raw or cooked.They are very tart. They can be stored on the counter but will last longer if they are refrigerated. The fruit can be frozen. The inside of the tomatillos reminded me of a fig. It does not taste anything like a fig.
Alright when I see a delicious cookie recipe, I figured I must try it out. I don't care if it is another chocolate chip cookie. My family encourage me to make them too so they can try them out. Now, I had some many different baking chips already in my cabinet that I figured another reason to try out this recipe. These cookies are good. It does make a lot of dough so I froze half of the recipe. I scooped out the batter and placed loosely covered in the freezer for 20 minutes. Then I transferred the dough to a storage bag and placed in the freezer. I told my daughter when she has a sweet tooth, she should bake up some of the dough. She told me that she was glad that she still had her sweet tooth and she was never going to pull that tooth out.
Four Chips Cookies
40 Tbsp (5 sticks) of unsalted butter
2 cups sugar
2 cups brown sugar
5 eggs
1 Tbsp vanilla
1 tsp baking soda
1 tsp salt
6 cups flour
2 cups semi sweet chocolate chips
1 cup dark chocolate chips
1/2 cup peanut butter chips
1/2 cup white chocolate chips
Directions:
- In a large bowl, cream the butter, sugar, and brown sugar until fluffy.
- Add the eggs and vanilla. Mix until incorporated.
- Add the baking soda, salt, and flour. Mix until incorporated.
- Fold in the chocolate chips, peanut butter chips, and the white chocolate chips.
- Cover with plastic wrap and refrigerate overnight.
- Preheat the oven to 350 degrees F.
- Line a baking sheet with parchment paper.
- Scoop the chilled batter onto the baking sheet. Space the cookies about 3 inches apart.
- Bake the cookies for at least 10 minutes and the edges are golden brown. The center should be almost set.
- Remove from the oven and allow to rest on the baking sheet for 5 minutes.
- Transfer the cookies onto a wire rack to cool completely.
Recipe adapted from Cookies and Cups.
One year ago..................................I made PB Layer Bars.
Two years ago................................I made Wheat Blueberry Muffins.
Did you already know.........................
-In 1927, the Ritz-Carlton opened their first hotel in Boston.
-When the hotel opened, the room rate was $15 a night.
-Until 1970, women had to be escorted to enter the Ritz Bar.
I am holding onto summer as long as I can. Yes, I know the kids are back to school. Yes, I have spotted some red leaves outside. Yes, all the signs are here that summer is leaving. So, I had to make a dish with basil and tomatoes. I really liked it. The meal didn't seem heavy and it was full of flavor. I think summer should not be in a rush to leave.
Basil and Tomato Chicken with Pasta
1/2 box of a 1 lb. box of pasta
1 Tbsp olive oil
3 boneless chicken breast
salt and pepper
2 large tomatoes, chopped
1/2 cup basil
2 cloves of garlic
1/4 cup chicken broth
2 Tbsp butter
2 Tbsp heavy cream
Garnish: Parmigiano cheese and basil
Directions:
- Cook the pasta according to directions.
- In a large skillet, heat the olive oil over medium heat.
- Season the chicken with salt and pepper
- Add the chicken to the skillet and cook for 4 minutes.
- Turn the chicken over in the skillet.
- Add the tomatoes, basil, and garlic.
- Allow to cook for 4 minutes.
- Add the chicken broth and butter.
- Place the cover on the chicken and allow to simmer until the chicken is thoroughly cooked.
- Add the heavy cream and stir.
- Remove the chicken from the skillet and place on a plate.
- Add the pasta to the skillet and mix.
- Serve the pasta with the sauce and top with the chicken.
Recipe adapted from Menu Musings.
One year ago..........................I made Peaches and Cream Cake.
Two years ago........................I made Mussels.
Three years ago......................I made Streusel Cake.
Did you already know................
-Basil is in the mint family.
-Basil is native to Asia but may have originated from India.
-Another name for basil is Saint Joseph's wort.
Since I was visiting the Old Port, my daughter asked me to buy this dessert for her. However when I went to the bakery, I was told it was out of season. So, I thought I could get out of it that easy. I said to my daughter, "Sorry Sweetie but they didn't have any until this Fall." Well, my daughter than suggested for me to make it. Reluctantly, I told her I would. It is very good. To me, I love anything with chocolate and nuts. It is a very rich dessert.
Almond Chocolate Tart
One 9 inch tart shell
1/2 cup sugar
1/3 cup milk
4 Tbsp unsalted butter
1/4 tsp vanilla extract
1/8 tsp salt
1 1/2 cups almonds, toasted and finely chopped
1 egg, beaten
2/3 cups bittersweet chocolate, finely chopped
3 Tbsp half and half
garnish: toasted almonds
Directions:
- In a small saucepan, combine the sugar, milk, butter, vanilla, and salt.
- Bring the mixture to a boil over medium heat.
- Remove the saucepan from the heat and stir in the chopped toasted almonds.
- Stir to combine and set aside to cool.
- Add the egg and mix well.
- In a tart pan, line with the tart shell.
- Pour the almond mixture evenly into the tart shell.
- Bake the tart for 20 minutes. Rotate the tart.
- Bake the tart for another 15 minutes or until golden brown.
- Remove from the oven and allow to cool completely.
- Add the chopped chocolate into a small heatproof bowl. Set aside.
- In a small saucepan, heat the half and half to a boil.
- Pour the heated half and half over the chopped chocolate. Stir until smooth.
- Pour the ganache evenly over the almond tart.
- Garnish with the additional toasted almonds.
Recipe adapted from the Standard Baking Co. Pastries Cookbook.
One year ago............................I made Corn Salsa.
Two years ago..........................I made PB Brownies.
Did you already know.......................
-The Old Port is located in Portland, Maine by the waterfront.
-The Old Port has cobbled streets and historic, brick buildings.
-In the Old Port, there are an assortment of stores, restaurants, and cruises.
 Oreo Cheesecake
 Did you already know.....................