Showing posts with label chocolate. Show all posts

Monday, August 27, 2012

Project Pastry Queen

 I am really glad I joined the Project Pastry Queen. It really made me try new recipes I probably never would have attempted to make like the Pavlovas. (They are my youngest daughter's favorite dessert.) This week's pick was a remake. It was picked by the host Shawnda who had the great idea to start this blogging club.
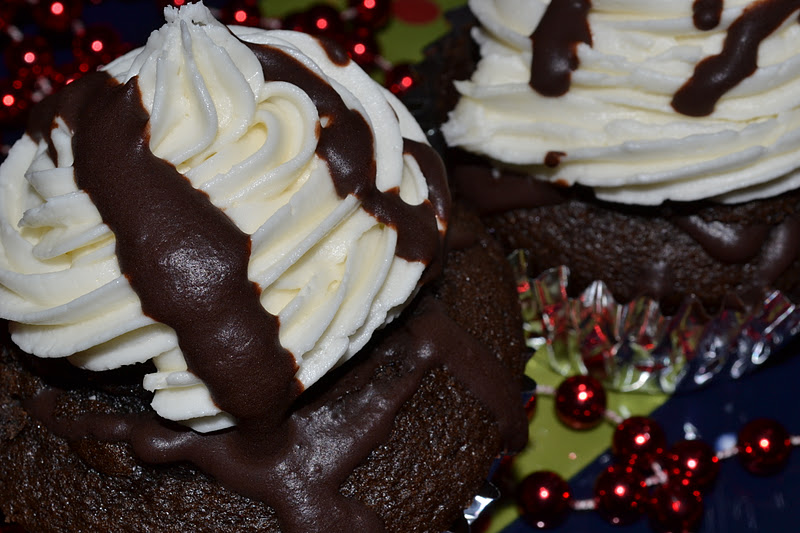
I debated whether to do it again or not. It was a lot of work. Also, I've been crazy busy. Then I read what I wrote next to the dessert. I wrote to make it next time with peanut butter as suggested by Emily.  It is rich. It is decadent. It is a dessert that is meant to be shared so I made mini ones this time. Please check out the other member's cakes since they are remarkable.
This photo shows the stages of the cake. The first one is the rich flourless cake. I mixed half the batter with peanut butter and topped it. The peanut butter part looks like a heart. The second stage is the center cake. the flourless cake is topped with the mousse that has been frozen. The furthest cake is the finished cake with the dark chocolate glaze topping. It is worth the trouble.
American Beauty Cake Peanut Butter
Cake:

1 cup unsalted butter

12 oz. bittersweet chocolate, chopped into small pieces

6 large eggs

1 cup sugar

1 Tbsp vanilla extract

1/2 cup peanut butter  
Mousse 

Dark Chocolate Glaze:

4 oz. bittersweet chocolate, chopped into small pieces

1/4 cup light corn syrup

1/2 cup heavy whipping cream

1 1/2 tsp. vanilla extract

1/2 cup peanut butter.

Directions:

To make the cake:


  1. Preheat the oven to 350 degrees.
  2. Line a muffin tin with cupcake papers.
  3. Place the cupcake pan in a roasting or baking pan to make sure it fits.
  4. Set a metal bowl over a saucepan that is holding  2 inch of simmering water.
  5. Melt the chocolate and butter in the metal bowl stirring until smooth. 
  6. Remove the bowl from the saucepan.
  7. In another bowl, whisk the eggs and sugar together.
  8. Whisk the sugar and eggs into the chocolate mixture until well combined. 
  9. Stir in the vanilla and mix well.
  10. Fill 12 cupcake liners with half the batter.
  11. The remaining half of the batter mix with the 1/2 cup peanut butter.
  12. Top the first layer of batter with the peanut butter layer. 
  13. In the roasting pan, fill the pan with hot water to come about two-thirds of the way up the side of the cake pan. Be careful no water enters the cake pan but just surrounds the cake pan.
  14. Bake for 20 minutes or until the cake is set.
  15. Let the cake cool completely in the pan and the cake will settle back down after rising. Do not remove the cake from the pan.
  16. On the cooled cake, spread the mousse filling the pan to the top.
  17. Wrap the cake with plastic wrap and freeze for at least 8 hours or up to 3 weeks.
To make the glaze:
  1. Place the chopped chocolate in a medium mixing bowl and set aside.
  2. In a sauce pan, combine the corn syrup, whipping cream, and vanilla. 
  3. After the mixture boils, pour it over the chopped chocolate and whisk until smooth.
  4. Allow the glaze to cool at room temperature.
  5. Stir in the 1/2 cup peanut butter.
    To assemble:

    Remove the cake from the freezer.\
  6. Peel off the cupcake liner.
  7. Pour the glaze over the frozen cake making sure the glaze needs to cover the sides of the cake.
  8. Allow the glaze to set at least one hour.
  9. After the glaze sets, cover with plastic wrap until ready to serve.
Recipe adapted from The Pastry Queen cookbook.
Did you already know...
- The author of The Pastry Queen Rebecca Rather began her career as a caterer.
-In 1999, Rebecca Rather opened her bakery Rather Sweet Bakery.
-Rather Sweet Bakery is currently closed but The Pink Pig will be opening tomorrow in Fredericksburg, Texas.

Tuesday, July 24, 2012

Raspberry Cream Sandwiches

I will admit my favorite way to eat raspberries are plain. I also love adding raspberries to my cereal. I add a little cereal and a lot of milk so I end up eating mostly raspberries with milk. What is your favorite way to eat raspberries? I know my daughters prefer plain.
 Since we normally eat the raspberries before I can make any recipes, I went raspberry picking twice this year. We probably will go again but it will be for some golden raspberries. Have you ever seen a golden raspberry? I saw this recipe at the beginning of the year and I bookmarked it. The cookie is a nice sugar cookie in which my daughter preferred with no filling. My husband saw me scrapping the vanilla bean and asked me what was I doing. I held out the vanilla bean and asked him to smell. He hesitated so my son did. My son looked up at his dad and said it is vanilla. My husband confirmed it was vanilla. I think my son spends a lot of time in the kitchen with me. Now, how do I get my husband in their more often is the question?
 Raspberry Cream Sandwiches
1 3/4 all purpose flour
2 tsp baking soda
1/4 tsp salt
10 Tbsp unsalted butter, softened
1 1/2 cups sugar
1 egg
1 Tbsp vanilla extract
1 vanilla bean, halved lengthwise, seeds scraped and reserved
1 1/3 cups fresh raspberries
1 Tbsp sugar, for the filling
7 oz. white chocolate, coarsely chopped
1/3 cup heavy cream

Directions:
  1. Preheat oven to 350 degrees F. 
  2. Line a baking sheet with parchment paper and set aside.
  3. In a large bowl, whisk together the flour, baking soda, and salt. 
  4. In another bowl, cream the butter and sugar together.
  5. Add the egg, vanilla, and scraped vanilla seeds into the sugar butter. Mix until smooth.
  6. Gradually add the flour mixture to the sugar butter mixture.
  7. Scoop 1 inch mounds of dough onto the baking sheet spacing the dough 2 inches apart. 
  8. Bake the cookies for 4 minutes and then rotate.
  9. Bake the cookies for another 4 to 5 minutes or until the cookies are golden.
  10. Allow the cookies to cool on wire racks.
  11. In a food processor, puree the raspberries and the sugar to make the filling.
  12. Pour the raspberries through a fine sieve to extract the juice and remove the seeds.
  13. Melt the chocolate in a double broiler over simmering water.
  14. Remove the melted chocolate from the heat and whisk in the cream in a slow, steady stream.
  15. Add the raspberry mixture to the chocolate. Whisk slowly until pale about 3 minutes. 
  16. Refrigerate the raspberry chocolate mixture for about 30 minutes.
  17. To assemble the cookies by spreading 1 Tbsp of the raspberry chocolate mixture on the bottom of one cookie. 
  18. Add another cookie to sandwich the filling in the middle.
  19. Cookies can be refrigerated between layers of wax paper in an airtight container at room temperature up to 2 days.
Recipe adapted from Martha Stewart's Cookies.
Did you already know...
-Different types of raspberries include red, golden, purple, and black.
-It is believed raspberries originated from Southeast Asia.
-Raspberries have a hollow core. Blackberries are not hollow in the center.

Wednesday, July 4, 2012

4th of July

Happy 4th of July! Do you have big plans? We are just hoping it will not rain. My youngest daughter keeps telling me that we can still go to the beach. It doesn't matter if it is raining since we will be getting wet anyways. I guess it is the perfect way to miss the crowd.
When I was growing up, we would visit my relatives in New Hampshire around the 4th of July. 4th of July was my grandmother's birthday. We would go swimming at the pond and visit with our relatives. Plus my uncles would have a fireworks war. 
 Chocolate Cookie Cutouts
1 1/2 cups all purpose flour
1/2 cups unsweetened cocoa powder
1/8 tsp salt
3/4 cup unsalted butter, room temperature
1 1/2 cups powder sugar, sifted
1 large egg, lightly beaten
1/2 tsp vanilla extract
nonparelis, colored sugar, other decorations

Directions:
  1. Line a baking sheet with parchment paper.
  2. In a medium bowl, sift the flour, cocoa powder, and salt.
  3. In a large bowl, cream the butter and powder sugar until fluffy.
  4. Add the egg to the butter mixture and vanilla.
  5. Slowly, add the flour to the butter mixture. Mix until incorporated.
  6. Wrap the dough in plastic wrap and refrigerate for 1 hour or overnight.
  7. After the dough is chilled, roll out the dough to 1/8 inch thickness onto a lightly floured surface.
  8. Using a cookie cutter, cut out the desired shapes. Transferred the cutout shapes to baking sheet, spacing them about 2 inches apart.
  9. Transfer the baking sheet to the refrigerator and allow to chill for 20 minutes. (I worked in batches so the dough was chilling while some were baking.)
  10. Sprinkle the dough with desired edible decorations. 
  11. Bake the cookies for about 8 minutes or until crisp.
  12. Allow the cookies to cool completely on wire racks.
Recipe adapted from Martha Stewart's Cookies.
(If you store these in plastic bags, the cookies will still taste good but will become soft.)
Did you already know...
-According to the weather channel, the weather in Philadelphia was 76 degrees F on July 4th, 1776.
-When the Continental Congress approved the Declaration of Independence on July 4th, 1776, there were 2.5 million people living in the newly independent nation.
-This July 4th, 2012, there is an estimated 314 million people living in the United States.
Happy Fourth of July!

Saturday, June 16, 2012

Icebox Dessert

It is hard to buy my husband a gift early. He seems to always be home when it arrives. It is just my luck. Well, my husband loves coffee. He drinks it all the time. It doesn't affect his sleep at all. Now, I drink half decaf sometimes. If I drink any past noon, I will not be sleeping any time soon. Which could be why I tend to do my blog late at night. So the day my husband received his new coffee maker, he made two cups. The machine takes k-cups and he thinks it is the coolest thing. The next day he had four cups. I have a feeling he really likes it.
Now, I haven't been feeling the best so the kids have been helping me in the kitchen. This is the best dessert for kids to make for Dad on Father's Day. I only instructed. I did not make it. My daughter loves it so we have made it several times. The first time I heard about this dessert was on Smitten Kitchen's website but the recipe is also on the box of the chocolate wafer cookies. I will say the first food blog I ever checked out was her website. I still check it out.
Oh, this is going to be good!
Icebox Dessert
2 cups heavy cream
2 Tbsp fine sugar
1 (9 oz.) package chocolate wafer cookies
1 oz. semi sweet chocolate square 
  1. In a large bowl, beat the cream with the sugar until soft peaks form.
  2. Take one cookie and spread the whipped cream on both sides.
  3. Add a cookie to the whipped cream cookie and continue to add cookies to each end to form a long train. 
  4. Take the remaining whipped cream and frost the top and down the sides of the cookie train to cover.
  5. Grate the chocolate over the whipped cream.
  6. Cover the dessert and refrigerate for at least several hours or overnight.
Recipe adapted from Smitten Kitchen.
Singing is allowed during assembly
Did you already know...
-It is estimated to be over 70 million father's in the U.S.
-In 1909, Sonora Dodd conceived the idea Father's Day to honor her widowed father who raised his six children.
- In 1966, President Lyndon Johnson designated Father's Day to be the 3rd Sunday in June.
-June was the month Sonora Dodd's father was born.

Saturday, April 28, 2012

Double Chocolate Cookies

Sometimes I will bake something and I never get a chance to post it. Why? My hidden stash is found. I think I will be finding a new hiding area. When I was a teenager, my best friend's father would hide his sweets in unusual places like the dishwasher. With my luck, my family would decide to do dishes for me and still find them.
Yes, these cookies are worthy of hiding them. I have made these cookies many times. At the moment, they are my favorite cookie.Since they are gigantic, I do share. It is a copy cat recipe from a cookie found at Levain Bakery.
Double Chocolate Cookies
1 cup unsalted butter, cubed and chilled
1 1/2 cup sugar
2 large eggs
1/2 cup dark cocoa powder
2 1/4 cups all purpose flour
1/2 tsp salt
1 tsp baking powder
2 1/2 cups semi sweet chocolate chips

Directions:
  1. Preheat oven to 350 degrees F.
  2. Combine the butter and sugar until light and fluffy.
  3. Add the eggs one at a time to the butter mixture.
  4. Mix in the cocoa powder and blend until well incorporated.
  5. Add the flour, salt, and baking powder and mix until just incorporated.
  6. Fold in the chocolate chips.
  7. Transfer the dough to a clean surface and knead briefly until well combined.
  8. Divide the dough into desired portion size. For giant cookies, divide into 12 equal pieces.
  9. Place the dough onto an ungreased cookie sheet 2 inches apart. 
  10. Bake the dough for about 16 minutes or until set.
  11. Allow the cookies to cool for about 5 minutes before transferring to a wire rack. 
Recipe adapted from Annie's Eats.

Waiting to take one of the last three cookies!
Did you already know...
-The first dishwasher patent was to Joel Houghton in 1850. His patent only splashed water on dishes.
-In 1886, Josephine Cochran decided to invent a workable, mechanical dishwasher in which she reveiled at the 1893 World Fair.
-Her main customers at the time were hotels and large restaurants.
-The general public was interested in her invention until the 1950s.

Does anyone know what famous company Josephine Cochran founded?

Tuesday, April 3, 2012

Chocolate and Peanut Butter Ribbon Dessert

My husband loves peanut butter. He also loves watching this show in which storage units are auctioned off. My oldest daughter loves the show too. As for me, I would rather blog. My son does not mind watching the show but he really hates the sound of the auctioneer's voice. He has to leave the room. I guess my son will not be pursuing the dream of being an auctioneer one day. 
 Since my husband loves peanut butter, I knew this dessert would be ideal for him. I guessed right. When my oldest daughter tried it, she said, "Whoa! This is great!" I would recommend this easy dessert.
Chocolate & Peanut Butter Ribbon Dessert
12 Nutter Butter cookies, crushed finely
2 Tbsp butter, melted
1 (8 oz.) package of reduced fat cream cheese, softened
3/4 cup creamy peanut butter
1/2 cup sugar
2 tsp vanilla
1 (12 oz.) container Cool Whip whipped topping, thawed
2 oz. semi sweet chocolate, melted

Directions:
  1. Mix the crushed Nutter Butter cookies with the melted butter.
  2. Press the mixture into the bottom of a parchment lined 9x5 loaf pan.
  3. In a bowl, mix the cream cheese, peanut butter, sugar, and vanilla until well incorporated.
  4. Whisk in 3 cups of the Cool Whip into the cream cheese mixture. 
  5. Remove 1/2 cup of the cream cheese mixture and place in a small bowl.
  6. Add the melted chocolate in the small bowl and mix well. Set aside.
  7. Spoon half of the cream cheese mixture over the pressed Nutter Butter cookies in the loaf pan. Spread evenly.
  8. Add the chocolate cream cheese mixture into the loaf pan. Spread evenly over the cream cheese mixture.
  9. Add the remaining cream cheese mixture on top of the chocolate cream cheese mixture.
  10. Place the loaf pan in the freezer for at least 4 hours or overnight.
  11. When ready to serve, invert the dessert onto a plate. Remove the parchment paper and reinvert the dessert onto a serving platter. 
  12. Add the remaining Cool Whip on top of the dessert with additional crushed cookies, if desired.
Recipe adapted from Kraft Foods Food and Family Cookbook.

Did you already know....
-In the State of Maine, an auctioneer must pass an examine to receive an auctioneer license.
-The auctioneer license must be renewed yearly.
-The auctioneer must have a surety bond for $10,000.

Wednesday, March 14, 2012

St. Patrick's Day Green

Do you wear green on St. Patrick's Day? Not only do we wear green on St. Patrick's Day, we even wear green the night before. Who really wants to be woken up by being pinched? Don't worry no one has been pinched to this date. It is like a game and no one gets caught without green in this household. Plus I wouldn't pinch anyone hard but I couldn't guarantee the kids play by the same rules. I sure don't want to find out.
Last year, I purchased The Perfect Scoop cookbook by David Lebovitz and my ice cream machine gets used often. If my husband had his way, it would be used daily. He has been disappointed lately since I haven't used it once this year. I wanted to continue with an Irish theme that was kid friendly. Since I didn't find one I liked, I decided to create one using the Chocolate Ice Cream, Philadelphia-Style as my template. The end result was delicious!
Irish Mint Chocolate Ice Cream
3/4 cups of Baileys Irish Cream Coffee Creamer
1 1/2 cups heavy cream
3/4 cup sugar
6 Tbsp unsweetened dark cocoa powder
1/8 tsp salt
3 oz. bittersweet chocolate, chopped
1 package of Andes Mint Chocolates, 18 pieces chopped
1 cup low fat milk
1/4 tsp mint extract

Directions:
  1. In a large saucepan, mix the creamer, heavy cream, sugar, cocoa powder, and salt.
  2. Over medium heat, mix the mixture until a rolling boil.
  3. Remove the pan from the heat and mix in the chopped bittersweet chocolate and half of the chopped mint chocolates.
  4. Stir until the chocolate has melted.
  5. Add the milk and the mint extract until well combined.
  6. Chill the mixture in the refrigerator for about 1 hour.
  7. Add the mixture to an ice cream machine. 
  8. Follow the ice cream machine's instructions for the amount of time to mix the mixture.
  9. At the end of the mixing cycle time, add the remaining chopped mint chocolates.
Created by Jen of Sweet Morris.
Did you already know..........
-The first St. Patrick's Day parade occurred in New York City in 1762.
-Besides New York, Boston, Savannah, Philadelphia, and Chicago have a St. Patrick's Day parade.
-Every year, Chicago dyes the Chicago River green to celebrate St. Patrick's Day. The city has been doing this tradition since 1962.

Monday, February 20, 2012

Mexican Chocolate Fudge-Pecan Cake

My son has nice, thick hair. His hair is so thick that when it becomes too long, his hockey helmet doesn't fit. Then he complains it hurts. Don't we all wish we had thick hair problems?  This weekend, I finally took him to get a haircut. While we were at his appointment, the hairdresser asked him to look in the mirror. He looked up and said he was having a staring contest with .............himself. His reflection blinked the same time as he did informed us. Lesson learn: it will always be a tie (you hope) if you have a staring contest with yourself. I guess if you are going to race your shadow and want to win make sure to run towards the sun. You should win every time. If not, you need to exercise more or be checked out. 
This week for Project Pastry Queen, I picked the Mexican Chocolate Fudge-Pecan Cake. This cake is rich, rich, and rich. My husband loved it but he wanted his glaze without pecans. My youngest daughter suggested to make the glaze and pour it over ice cream next time. My oldest daughter concurred with my youngest daughters suggestion. I made a small heart shape cake and little Bundt cakes. I will admit I forgot to toast my pecans and (as you can see) chop them but I think it tasted wonderful just with all the chocolate glaze on them.
Mexican Chocolate Fudge-Pecan Cake
Cake:
1 cup butter, unsalted
1/2 cup unsweetened Dutch-process cocoa powder
3/4 cup water
2 cups sugar
2 eggs
1 cup buttermilk
3 Tbsp vanilla extract
2 cups all purpose flour
1 tsp baking soda
1 1/2 tsp ground cinnamon
1/2 tsp salt

Directions for the cake:
  1. Preheat oven to 350 degrees F. 
  2. Grease a Bundt pan or cupcake tin generously. 
  3. Dust pan with flour and shake off any excess flour. Set aside.
  4. Melt the butter in a large saucepan over medium low heat. 
  5. Add the cocoa powder and whisk until smooth.
  6. Add the water and whisk until smooth. Do not let the mixture boil.
  7. Remove the saucepan from the heat. 
  8. Add the sugar, eggs, buttermilk, and vanilla to the the cocoa mixture.
  9. Whisk until smooth.
  10. Add the flour, baking soda, cinnamon, and salt. 
  11. Whisk until completely incorporated. There may be lumps.
  12. Pour the batter into your greased pans about 2/3 full.
  13. Bake for 40-45 minutes for the Bundt pan or about 20 minutes for cupcakes. The cake is done when the cake pulls slightly away from the sides of the pan and it feels firm to touch.
  14. Allow the cake to cook in the pan for 20 minutes. 
  15. Remove from the pan by loosing the sides with a knife. 
  16. Spoon the glaze (recipe below) over the cool cake. 
Glaze:
1 cup pecans
1/2 cup butter, unsalted
1/4 cup milk
1/2 cup high-quality coca powder
2 cups powdered sugar, sifted
1 Tbsp vanilla extract
1/2 tsp salt

Directions for the glaze:
  1. Arrange the pecans in a single layer on a baking sheet. 
  2. Toast the pecans for 7 to 9 minutes at 350 degrees F.
  3. Remove and allow to cool and chop.
  4. In a medium saucepan, melt the butter over low heat.
  5. Add the milk, cocoa powder, and powdered sugar. Whisk until glossy.
  6. Remove the saucepan from the heat and whisk in the vanilla, salt, and pecans. 
  7. Spoon the glaze over the cooled cake (or ice cream).
Recipe adapted from The Pastry Queen cookbook. 
 Please make sure to check out the other Project Pastry Queen members posting and variations of this wonderful dessert.
Did you already know............. 
-It is believed Christopher Columbus was the first to introduce Europe to the cocoa bean.
-Chocolate didn't become popular in Europe until 1519 when Hernando Cortez observed the Aztec ruler drinking a beverage containing the cocoa bean. He introduced the drink to the rulers of Europe.

Friday, February 10, 2012

Nutella Molten Chocolate Cake

I am going to surprise you. I know you have already read the title about what I am blogging about but I will still surprise you. Why is this dessert a surprise? Because this dessert is so surprising easy to make! Not only is it easy, the other surprise is how inexpensive it is to make. Now if you go to a nice restaurant like we did this past weekend, you will be surprised that it may cost $8 for one of these. I know just for one. We took a mini weekend trip up to the Bar Harbor area. (Yes, we know it is winter.) 
Since my youngest daughter was 100 months old, I told her she could get any dessert she wanted. Of all the dessert, she picked the $5 Oreo shake. I guess I don't make her enough shakes around here. See I am trying to distract you from the fact that I did celebrate my daughter turning 100 months. My husband just goes with it since he knows he'll benefit with a special treat! No, we didn't buy her a present. Let's not go overboard about this celebration. When she reaches 1,000 months and I'm still around, I'll buy her a present then.
I was really surprised how much the restaurant charged for this dessert since I make it all of the time at home for friends. I was able to make six of these for less than $8 plus I added a little of Nutella to mine! Aren't I fancy? Really, I just happened to have the Nutella still on the counter after making my daughter's lunch.
Nutella Molten Chocolate Cake

6 oz. of bittersweet chocolate (or a package of Baker's Baking Squares)
10 Tbsp butter
1/4 cup Nutella
1 3/4 cups of powdered sugar
1/2 cup flour
3 eggs
3 egg yolks
fresh berries, additional powder sugar, or chocolate fudge, etc for garnish

Directions:
  1. Grease six 6 oz. ramekins or oven proof glass bowls with cooking spray. Preheat oven to 425 F. 
  2. Microwave the chocolate, butter, and Nutella for about 2 minutes so all of the butter can melt. Stir well to combine.
  3. Add the flour and the powder sugar until well incorporated.
  4. Add the eggs and egg yolks. Beat until well blended.
  5. Pour into the 6 dishes.
  6. Bake for 15 minutes. The cakes should be firm around the edges but soft in the center.
  7. Let sit at room temperature for 1 minute.
  8. Run a knife around the edge of the cake to loosen from the sides of the dish.
  9. Place a plate on top of the ramekin facing down and flip. Top the cakes with your desired garnish. Wait a few minutes before serving since the insides of the cake will be really hot and gooey. 
Recipe adapted from the back of the Baker's Bittersweet Baking Chocolate Squares.
Did you already know.....
-Acadia National Park is adjacent to Bar Harbor.
- In the 19th century, Bar Harbor was a summer resort for the Rockefellers, Fords, Astors, etc.
-In Acadia National Park, Cadillac Mountain is where the sunlight of dawn first reaches the continental United States.
What we did in the Bar Harbor area!

Wednesday, December 28, 2011

Chocolate Cupcakes

My son has been singing "Its the best day ever." He has been singing this song since Christmas morning. I have a strong feeling he was happy with all of his gifts.
 Since Christmas, we have a lot of family and friends with birthdays. I decided to make a chocolate cupcake. Since this cupcake is not the Boozy Bourbon Chocolate Cupcakes, these cupcakes are perfect for everyone.  I did put a little instant chocolate pudding in the middle instead of the previous filling. Also, the difference between the previous frosting and this one is I replaced the liqueur with melted unsweetened chocolate.
Moist Chocolate Cupcakes


2 cups cake flour
1 1/2 tsp baking powder
1/2 tsp baking soda
1/2 tsp salt
3/4 cup unsweetened cocoa powder
1/2 cup unsalted butter, soft
1/3 cup vegetable oil
1 tsp vanilla extract
1 3/4 cup milk
4 large eggs

Directions:
  1. Line 18 cupcake tin with liners.
  2. Preheat oven to 350 degrees.
  3. Sift the flour, baking powder, baking soda, salt, cocoa, and sugar.
  4. In a separate bowl, beat the butter at low speed for 1 minute.
  5. Add the oil to the butter and continue beating until texture of sand.
  6. Add the milk with the vanilla to the butter. 
  7. Mix for about 2 minutes while scraping down every minute.
  8. Add the eggs one at a time. Beat well. The batter should be thin.
  9. Fill the cupcake liners about 3/4 full. 
  10. Bake the cupcakes for about 20 minutes or a toothpick inserted in the middle comes out clean.
  11. Allow the cupcakes to cool before frosting.
Recipe adapted from the Moist Chocolate Cake recipe on the back of the King Arthur Flour unbleached cake flour blend.
Did you already know............
-Medieval pudding was made out of meats.
-In the 1930s, instant puddings were available. 
-The first instant pudding Jello introduced was chocolate.

Saturday, December 17, 2011

Boozy Bourbon Chocolate Cupcakes

Normally, I make children friendly recipes. This is an adult dessert. There is alcohol in the cake, filling, and frosting. My husband's work was having a holiday get together and I thought this would be a popular dessert to bring. My husband agreed.
I made sure the kids did not have one of these. I will remake these at a later date with no alcohol. I did ask my husband if he could taste the alcohol. He said no but then admitted he had a cold. I asked my favorite friend if she could taste the alcohol and she said yes. I hope you enjoy these cupcakes.
Boozy Bourbon Chocolate Cupcakes
Cupcakes:
1 box Dark Chocolate cake mix
1 cup skim milk/water
1/3 cup vegetable oil
1/4 Bourbon whiskey
3 eggs
1 tsp vanilla

Filling:
3/4 cup heavy cream
6 oz. semi-sweet baking chocolates squares/chips
1/3 cup butter
3 Tbsp Godiva chocolate liqueur


Frosting:
1 1/2 sticks of butter, softened
 3-4 cups powdered sugar
3 Tbsp Godiva White Chocolate liqueur
1 tsp vanilla extract


Directions:
Cake:
  1. Preheat oven to 350 degrees.
  2. Line a cupcake pan with cupcake liners.
  3. Mix cake mix, milk, oil, bourbon, eggs, and vanilla.
  4. Fill the cupcake liners about two-thirds full.
  5. Bake about 20 minutes or until done.
  6. Cool for about 10 minutes.
Filling:
  1. Heat the heavy cream with the squares in a microwave safe bowl for about 1 minute. Stir and repeat in 30 minute increments until the chocolate is melted. Stir between increments.
  2. Stir in the butter until melted and then add the liqueur.
  3. Place in the refrigerator to cool.
Frosting:
  1. Cream the butter with 2 cups of powdered sugar until fluffy. 
  2. Add the liqueur and the vanilla. 
  3. Combine and continue adding 1/2 cup of powdered sugar until the frosting reaches the desired consistency.
Assembly:
  1. Cut off the top of the cupcake and place to the side. 
  2. Cut a small hole in the center of the cupcake and set to the side. 
  3. Add the filling into the center and on the top of the cut piece. 
  4. Place the center and top of the cupcake back to its original place. 
  5. Frost each cupcake top. 
  6. Repeat process until all the cupcakes are frosted. 
  7. Take the filling and heat in the microwave about 30 seconds. 
  8. Stir and drizzle over the top of each cupcakes. Enjoy!
Recipe adapted from Betty Crocker website.

Did you already know.............
-In 1926, Joseph Draps founded Godiva Chocolatier in Brussels, Belgium.
-The company is named in honor of the Lady Godiva legend.
-Lady Godiva legend tells about an Anglo-Saxon Lady in the 12th century who was dared by her husband to ride through town naked. If she did it, he would lift his oppressive taxes on his people. She asked the town to stay inside and not peek. She accomplished the dare with only Tom peeking (Peeping Tom) and helped her people.
If you eat too many of these cupcakes, your world may become a little tilted. Please do not follow Lady Godiva's example.

Tuesday, December 13, 2011

Allie's Bars

I asked my family if there were any dessert request for the holiday season. My oldest daughter asked for those bars with the coconut. I have not made any dessert bars with coconut for years. Do you know why I knew what my daughter was talking about? She is not a big fan of coconut so I thought I knew the recipe. 
 I searched cook books and online. I could only find similar recipes. I found the Eagle Brand Magic Cookie Bars and the Gooey Coconut Dream Bars. Both recipes looked familiar but it wasn't the one I remembered. The dessert bar had coconut, chocolate, caramel, marshmallows, and mini snicker bars. Then I realized I was thinking about two different recipes. I think one recipe was actually a blondie. Since I could not find the recipe I wanted, I created this recipe with my oldest daughter's help. The recipe is called Allie's bars since it has everything she likes in it. Please adjust the recipe to your liking.
Allie's Bars
5 low fat graham crackers, crushed finely
3/4 cups butter, melted
1/8 tsp salt
1 (14 oz.) Sweetened Condensed milk
1 cup miniature semi-sweet chocolate chips
1 cup Heath milk chocolate toffee bits
1 cup sweetened coconut flakes
10 caramel pieces, cut in quarters
10 miniature snicker bars, cut in quarters
1 cup of miniature marshmallows, cut in half
1/2 cup peanuts

Directions:
  1. Preheat oven to 350 degrees.
  2. Combine the crackers, butter, and salt.
  3. Press the mixture on the bottom of a 9 x13 baking dish.
  4. Pour half of the sweetened condense milk on top of the graham cracker crust to coat.
  5. Sprinkle 1/2 cup of the chocolate chips and 1 cup of the Heath bits over the sweetened condense milk.
  6. Sprinkle 1/2 cup of the coconut flakes over the chocolate chips.
  7. Top the coconut flakes with the caramel, snicker bars, and marshmallow pieces.
  8. Add the peanuts then top with the remaining chocolate chips and coconut flakes.
  9. Drizzle the remaining can of sweetened condense milk over the bars.
  10. Bake the bars for about 25 minutes or until the coconut is golden brown.
  11. Remove and let the dish cool for at least 30 minutes before placing in the refrigerator.
  12. After the bars have harden, cut into desired pieces.
Recipe from Jen of Sweet Morris.
 Did you already know.................
-In the 1960s, the Magic Cookie Bar was introduced.
-It is found on the back of the Eagle Brand Sweetened Condensed Milk.
-In 1856, Gail Borden invented the milk product due to lack of refrigeration.
-The Eagle Brand is owned by Smucker Foods of Canada.

Saturday, December 3, 2011

Easy Chocolate Fudge

Fudge has always been a special treat around the holidays. When I enter a candy store, I will occasionally choose it over the other treats. So when I saw this recipe, I decided to make it. All I had to use was a microwave. It was that easy. I will tell you this is very good.
 The recipe calls for nuts so I didn't argue while I mixed it into the chocolate. I guess you could try it without the nuts. My husband wish I had tried making it without nuts since he isn't a big fan of them. Yes, he loves peanut butter but he doesn't eat nuts. I guess it is the same as liking pickles but not cucumbers. Or liking salsa but not tomatoes? Or liking humus but not beans? If you can think of any, you can continue my comparison.
Baker's Classic Chocolate Fudge


8 (1 oz square) Baker's Semi-Sweet Chocolate Baking Chocolate Squares
1 (14oz) can sweetened condensed milk
1 cup chopped pecans
2 tsp vanilla


Directions:
  1. Line an 8 inch square pan with parchment or microwave wax paper.
  2. Microwave the chocolate and condensed milk** in a microwave safe bowl for 2 minutes.
  3. Stir and microwave for another 30 seconds to 1 minute until all the chocolate is melted.
  4. Add the vanilla and mix.
  5. Fold in the nuts until incorporated.
  6. Spread the batter into the square pan.
  7. Refrigerate for two hours or until the fudge is firm. 
  8. Remove from pan and cut into desire size or slab.
**I used probably about 10 oz. of the can and the recipe was great.
Recipe adapted from the recipe located inside the Baker's Semi-Sweet Baking package.
Did you already know..........
 -Fudge originated in America.
-Many colleges have their own version of a fudge recipe like Vassar college and Wesley college.
-Michigan is suppose to be the fudge capital.
-Fudge should be stored at room temperature in an air tight container.

Friday, December 2, 2011

Buckeye Peanut Butter Balls

My oldest daughter has been applying to colleges. I have been proud of her for all the applications that she has sent out. I hope she will stay in state. Her paternal side really hopes she will go to a school in Ohio. My daughter has been receiving gifts since she was an infant with this school's logo or name. 
Since my husband loves peanut butter and my daughter just applied to this school in Ohio, I figured I should make some Buckeyes. This Buckeye recipe is very close to a peanut butter cup. It is a peanut butter ball with a coating of chocolate on the outside.
Buckeye Peanut Butter Balls


1 1/2 cups creamy peanut butter
1/2 cup butter, softened
1 tsp vanilla extract
3 1/2 to 4 cups powder sugar, sifted
6 oz. chocolate chips, semi-sweet
1 Tbsp shortening


Directions:
Cream the peanut butter with the butter.
Add the vanilla extract to the peanut butter mixture.
Add one cup of unpacked powder sugar into the mixture and combine.
Continue to add one cup of unpacked powder sugar into the mixture until a stiff dough forms. Try to prevent the peanut butters being dry.
Form the peanut butter dough into smooth balls and place on wax paper.
Stick a toothpick into the middle of each ball.
Refrigerate for about an hour or two so the dough can harden.
After the dough hardens, in a small saucepan melt the chocolate chips and shortening.
Dip the peanut butter balls into the melted chocolate but leave a small area of the ball uncovered.
Place the covered peanut butter balls onto wax paper to set. Remove the toothpick and try to smooth over the toothpick hole. It may be easier to keep half the peanut butter balls in the refrigerator to stay hard.
Refrigerate for about 30 minutes for the chocolate to harden. 


Source adapted from Allrecipes.
Did you already know.............
-The Buckeye Tree is the Ohio State Tree.
-The Buckeye Tree received its name from Native Americans who thought the seeds looked like the eye of a male deer.
-The Buckeye nut is suppose to be a good luck charm.
-Since 1950, Ohio State has used the buckeye as it's nickname and later for its mascot.


Go Buckeyes!

Friday, November 18, 2011

Chocolate-Peanut Butter Whoopie Pies

A while ago, I use to give my sister a subscription to her favorite magazine. It was a gift that she could enjoy all year long. Maybe think of me? 
Since my Mom knew I like to read magazines, she asked me if I wanted a subscription to her favorite magazine. I said sure. In the magazine, it has a monthly recipe contest you can enter. I thought sure, why not. Wouldn't it be cool to win something? The recipe contest for that month featured peanut butter. My husband loves peanut butter. I had experimented with lots of recipes that weekend and this recipe is the one I entered two years ago. I was very happy when I heard that my recipe was selected and featured in the magazine. I didn't win the top prize but I did win. I did the happy dance because I won. Any time I win something I perform the happy dance. My husband finds me very amusing. The kids just dance with me.
Chocolate-Peanut Butter Whoopie Pies
1 (12 oz.) package miniature semisweet chocolate chips
2 Tbsp milk
3/4 cup butter, softened
1/4 cup creamy peanut butter
1 1/2 cups sugar
1 tsp baking soda
1 tsp baking powder
2 eggs
1/2 cup milk
2 tsp vanilla
1/2 cup unsweetened cocoa powder
3 cups all purpose flour
Filling recipe below


Directions:
  1. Preheat oven to 350 degrees F. 
  2. Set aside 1/4 cup chocolate pieces to sprinkle on cookies.
  3. In microwave-safe bowl, combine 1 cup of the chocolate pieces and 2 tablespoons milk. Microwave for1 minute or until melted; stir once. Set aside. 
  4. In another bowl, beat butter and peanut butter until combine. 
  5. Add sugar, soda, baking powder, and 1/2 teaspoon salt; beat to combine. Add eggs, 1/2 cup milk, vanilla, and melted chocolate; beat until combined. 
  6. Beat in cocoa powder and flour until combined. 
  7. Stir in remaining chocolate pieces except the 1/4 cup of chocolate pieces.
  8. Drop by rounded teaspoons 2 inches apart onto ungreased cookie sheets. Sprinkle with reserved chocolate. 
  9. Bake 9 minutes or until tops are set. 
  10. Cool on sheets 1 minute. Transfer to wire racks; cool completely. 
  11. To assemble, spread flat sides of half the cookies with Filling; top with remaining cookies.
Peanut Butter Filling
1 cup butter, softened
1 cup creamy peanut butter
1 cup marshmallow creme
2 cups powder sugar
2 Tbsp milk

In a bowl, combine all the ingredients except the milk.
Add one Tbsp milk at a time until the desired filling consistency.

My recipe adapted from Better Homes and Gardens.
Did you already know.............. 
-Better Homes and Gardens has been around since 1922.
-In 1924, Fruit, Garden and Home changed its name to Better Homes and Gardens magazine.
-In the U.S., Better Homes and Gardens is the fourth best selling magazine.