Sunday, August 19, 2012

Peach and Pluot Cobbler

Good Morning! This week for Project Pastry Queen was a wild card. Of all the recipes I haven't tried, it really wasn't a hard choice which one I was going to make. See, I had been given two bags full of peaches so I had a starting point. I had also purchased a large container of pluots so I needed to use them up too. When I noticed the Hill Country Peach Cobbler recipe, I knew it was perfect with what I had on hand.
Since it was a previously picked recipe by Josie, I was able to read the great reviews for this recipe. I will admit my batter did overflow so if you decide to make this either use a very large pan or just place a dish under it. The topping is not your typical heavy crust. It was light and sweet. It accompanied the browned butter, fruit filling perfect. This recipe is adaptable for many different fruit combinations. As I even type this recipe, I want more!
Peach and Pluot Cobbler
1/2 cup unsalted butter
1 cup sugar
1 cup all purpose flour
1 Tbsp baking powder
3/4 cup milk
2 cups fresh peaches, sliced or peeled
1 cup fresh pluot, sliced or peeled with skin removed
1/2 cup firmly packed brown sugar

Directions:
  1. Preheat oven to 350 degress F.
  2. In a small saute pan, melt the butter over medium high heat until it bubbles and turns a nut-brown color.
  3. Pour the butter into an 8 inch square baking dish.
  4. In a medium bowl, stir the sugar, flour, baking powder, and milk.
  5. Pour the milk mixture over the melted butter. DO NOT STIR.
  6. Arrange the fruit evenly over the top of the milk mixture. Do not mix. 
  7. Sprinkle the brown sugar over the cobbler.
  8. Bake the cobbler for 40 to 45 minutes, until the top turns a golden brown.
  9. Serve warm or at room temperature.
Recipe adapted from the The Pastry Queen cookbook by Rebecca Rather. 
Did you already know....
-A pluot is an hybrid of a plum and an apricot.
-Pluots are a good source of Vitamin A, Vitamin C, and fiber.
-Pluots were created by Floyd Zaiger by using cross pollination.

Friday, August 17, 2012

A Birthday and a Wedding

Let's party like it's my sister's birthday! What a wonderful way to celebrate Friday by a birthday. When anyone asks who is younger I always say I am. Usually, the person says I thought so and I think they are great since they must know I am older especially with a 7 year difference.
 Happy Birthday Sam!
The other exciting event today is my other sister is getting married! It is going to be beautiful. Everyone should marry a person who makes them a better person and I'm glad my sister has found that man. I held a bridal shower this past weekend for her and I made these cupcakes for her.
Blueberry cupcakes
1/4 cup unsalted butter, softened
3/4 cup sugar
2 eggs
1/2 cup sour cream
1/4 cup vegetable oil
1 Tbsp vanilla extract
1 3/4 cup cake flour
1 1/2 tsp baking powder
1/2 tsp baking soda
1/4 tsp salt
2/3 cup milk
1 1/2 fresh wild blueberries

Directions:
  1. Preheat oven to 350 degrees F. 
  2. Line a muffin tin with cupcake liners.
  3. In a large mixing bowl, cream the butter sugar until light and fluffy.
  4. Add the eggs one at a time, beating well after adding each egg. 
  5. Add in the sour cream, vegetable oil, and vanilla extract.
  6. Gradually add the cake flour, baking powder, baking soda, and salt.
  7. Add the milk and stir until the batter is smooth.
  8. Gently fold in the blueberries.
  9. Fill each cupcake liner 2/3 full.
  10. Bake for 16 to 18 minutes.
  11. Remover from the oven and transfer the cupcakes to a cooling rack.
  12. Allow the cupcakes to cool to room temperature before frosting.
Recipe adapted from the Pastry Affair.
Did you already know...
Some wedding folklore is:
-The luckiest day to marry is suppose to be Wednesday.
-To ensure wedding bliss, the bride should wear gold earrings. -It is considered good luck for the bride to find a spider on her wedding gown.
 To my sisters, I hope you both have a perfect day!

Tuesday, August 14, 2012

Chicken Sandwich

My husband asked my son if he could be good at an appointment for an hour. My son said honestly no. My husband asked him why. My son said because he couldn't go that long without food. We do feed the boy (regularly). Can you imagine having the same type of conversation with your boss? Jen, can you attend this training? No. Why not? Because they don't feed me on planes anymore. I don't think it will work. 
Near where we live, there is a drive in restaurant like they had back in the day. This restaurant makes a great chicken sandwich.I wanted to try my own attempt at making a juicy, chicken sandwich. It was juicy and a great break from hamburgers.
Chicken Sandwich
4 chicken breast
1/4 cup olive oil
1 Tbsp lemon juice
2 tsp thyme
2 tsp oregano
1 tsp rosemary
salt and pepper for taste
hamburger buns, lettuce, tomato, cheese, mayo, and other desired toppings

Directions:
  1. In a sealable plastic bag, combine the olive oil, lemon juice, and the herbs.
  2. Add the chicken breast and refrigerate for 30 minutes.
  3. In a large skillet, heat the skillet over medium heat.
  4. Add the chicken breast and cook for about 5 minutes.
  5. Flip the chicken over and cook for another 5 minutes. Check the chicken is cooked through if not continue to cook the chicken until the chicken is cooked through. 
  6. Remove from the skillet and allow to rest on a plate for 5 minutes before serving.
Recipe by Jen of Sweet Morris
Did you already know.....
-In 1936, the first drive in restaurant opened in California.
-Drive in restaurants were very popular in the 1950s.
-The wait staff at a drive in restaurant are called carhops.

Monday, August 13, 2012

Pineapple Kolaches

When I first purchased the Pastry Queen cookbook, I noticed the recipe for kolache right off. The photo looked like a yeast bun of some type. They looked familiar but I wasn't sure if I had ever had it before. Silly me! I have even made Kolaches before with a cheese filling and a dry apricot filling. When I made them before, I thought they were a danish but not so sweet or sticky. I think it was the filling in a yeast bread. I went back to my old cookbook and sure enough I had made them before. It was a bread machine cookbook. I know I made this before because I write a comment in my cookbooks of recipes I have made. I need to know if it is worth making the recipe again.
This weeks Project Pastry Queen was picked by Emily of She Makes and Bakes. Please check out the other member's variation since this recipe is so adaptable with some many different fillings. I will be trying this recipe again with a different filling. This time I used pineapple since I had it on hand. Since the recipe makes so many buns (yields about 18 buns), I made some sandwiches with ham and sharp cheddar. They aren't too sweet but very light.
Kolaches
Dough:
2 cups milk
1 (1/4 oz.) package dry yeast
1/2 cup unsalted butter
2 eggs
1 1/2 cups sugar
1 tsp salt
8 1/2 cups all purpose flour

Filling:
1 oz. can crushed pineapple in its own juice
1 Tbsp cornstarch
2 Tbsp unsalted butter

Streusel Topping:
3/4 cup all purpose flour
3/4 cup sugar
4 Tbsp unsalted butter, chilled and cut into small pieces

Directions:
  1. In a medium saucepan, heat the milk over medium heat until it begins to steam and forms a skin. Do not boil.
  2. Allow the milk to cool for about 10 to 15 minutes and the temperature of the milk has registered about 110 degrees F.
  3. Dissolve the yeast in the lukewarm water and allow it to set for 5 minutes.
  4. Microwave the butter until it has melted. Allow to cool for 5 minutes. 
  5. In a large bowl, whisk the eggs, sugar, salt, and melted butter.
  6. Add the cooled milk and the yeast mixture.
  7. Gradually, add the flour to the batter, 2 cups at a time.
  8. With a wooden spoon, mix the flour with the wet ingredients with a light touch.
  9. Keep adding flour until the dough begins to hold together and is incorporated. The dough will be sticky, moist, and light.
  10. Lightly grease a large bowl with cooking spray.
  11. Transfer the dough to the bowl and cover loosely with plastic wrap.
  12. Let the dough rise for 1 to 2 hours. 
  13. Punch down the dough until it deflates. 
  14. Cover the bowl again with plastic wrap and refrigerate the dough for at least 4 hours or overnight.
  15. To make the pineapple filling: combine the pineapple with the cornstarch in a small saucepan. Over medium heat, cook the pineapple for about 3 to 5 minutes or until the sauce thickens. 
  16. Stir in 2 Tbsp unsalted butter. Set aside.
  17. Grease a 12x17 inch baking sheet with cooking spray.
  18. With lightly greased fingertips, shape the dough into 2 1/2 inch diameter balls. Arrange the dough evenly onto the baking pan, 3 across and 6 down.
  19. Make a generous indentation into the each ball of dough. Do not pierce the bottom of the dough.
  20. Mound about 1 heaping tsp. of pineapple filling into the dough indentation.
  21. Cover the dough balls with a clean tea towel and allow to rise about 1 hour and the dough has almost doubled in size.
  22. Preheat the oven to 375 degrees F.
  23. To make the streusel topping: in a food processor, mix the flour, sugar, and the butter until crumbly.
  24. Scatter the streusel topping generously over the dough balls.
  25. Bake the kolaches for about 25 to 30 minutes and lightly browned on top.
  26. Allow the kolaches to cool for 20 minutes before serving.
Recipe adapted from Rebecca Rather of Pastry Queen cookbook. 
Did you already know...
-Kolaches are individual pastries that originate from Eastern Europe.
-They typically have a fruit or cheese filling.
-They are often eaten at Easter or Christmas time.

Thursday, August 9, 2012

Victoria Sandwich Cake

I am so glad my husband loves me. I know I have a sarcastic sense of humor. I think this is a trait I learned from my father. My husband was telling me a story about something he saw on the news. Then he says to me, "Well, you know Massachusetts is close to Maine." So, I replied, "It is? I didn't know that." See my husband doesn't get mad by my reply. He doesn't even make a sarcastic remark back. He just keeps telling me the story. Now, that is love!
Have you ever had a Victoria Sandwich Cake? It must have been the inspiration of the New England whoopie pie. The cake has the filling in the center. The filling is creamy and butter. Also, there is jam on top of the filling which gives it additional flavor. The cake is sponge like. Now, my first attempt tasted very good but was more dense than it should have been. The second time I measured everything like the original recipe than I converted the measurements for anyone who doesn't have a food scale. If you are planning a tea party, this is the perfect dessert to make.
Victoria Sandwich Cake
1 1/4 cup fine sugar
14 Tbsp butter, softened
3 eggs
2 1/4 cup self rising flour
2 tsp baking powder
2 Tbsp milk

Filling
7 Tbsp butter, softened
1 1/2 cups powdered sugar
1 1/2 cups strawberry jam
powdered sugar, for decoration

Directions:
  1. Heat the oven to 375 degrees F.
  2. Spray two 8 inch non stick cake pans with cooking spray. Line with parchment paper and spray the parchment paper with cooking spray.
  3. In a large bowl, mix the sugar, butter, eggs, flour, baking powder, and milk together until smooth.
  4. Divide the batter evenly between the two cake pans.
  5. Bake the cake for about 20 minutes or until golden brown.
  6. Allow to cool for a few minutes and turn onto a cooling rack. Allow to cool completely.
  7. In a medium bowl, cream the butter until smooth and creamy to make the filling. 
  8. Gradually add the sugar to the butter.  
  9. To assemble, place one cake onto the serving platter. 
  10. Top the cake with the butter filling.
  11. Spread the jam on top of the butter filling.
  12. Top the jam and butter filling with the remaining cake.
  13. Dust the top of the cakes with the powdered sugar immediately before serving. 
  14. Keep in an airtight container and eat within two days.
 Recipe adapted from BBC Good Food.
 Did you already know...
-The cake is named after Queen Victoria.
-The cake was served during Queen Victoria's reign with afternoon tea.
-The cake can be served as little sandwiches if baked as a long loaf.

Tuesday, August 7, 2012

Steak and Ale Pie

I try to encourage my children to read often. I bring them to the library which they like. I also purchase books for them. I recently purchased a book for my son. I thought he would like it since it was scary. It was by R. L. Stine and called How to kill a monster. Doesn't the title seem like a book for a boy? The cover said Step One: Run Step Two: Run faster. I guess my son was feeling a little tough that day since he read the cover and informed me that it was a girl's book. My son would fight the monster and not run. (I think if the monster was scary enough he would be running faster than his sister. I meant he is really tough.)
As I continue my British dishes in honor of the Olympics, I made Steak and Ale Pie. I had never had Steak and Ale Pie until my friend recommended it to me. I asked my Dad if he had tried it. He told me that he liked it very much and even my daughter tried it. After making this dish, my daughter informed me that this recipe was better than the one she tried before. I think she is sweet.
Steak and Ale Pie
(Servings: 6 to 8)
1/4 cup all purpose flour
1/2 tsp salt
1/8 tsp freshly ground black pepper
2 pounds stew beef, fat trimmed and cut into 1 1/2 inch pieces
2 Tbsp olive oil
1 large onion, sliced
2 cloves garlic, minced

10ounces (about 5) Portabella mushrooms, sliced 1/2 inch thick
1 cup dark ale
3 cups beef broth (I used chicken broth)
1 tsp dried sage
1/2 tsp dried thyme


Topping:
2 eggs
2 egg whites, stiffly beaten
1 tsp salt
1 cup all purpose flour
1 cup milk


Directions:
  1. Preheat the oven to 350 degrees F.
    In a food processor, pulse the whole eggs about 3 times.
  2. Add the salt, flour, and milk to the eggs. Blend for 45 seconds.
  3. Place the egg mixture in the refrigerator for 45 minutes.
  4. In a large plastic bag, combine the flour, salt, and pepper.
  5. Add a few beef pieces at a time to the plastic bag and shake to coat the meat.
  6. In a large pan, heat the oil. 
  7. Add the meat and brown on all sides. Remove the meat and transfer to a plate.
  8. Add the onion and garlic to the large pan. Saute for 2 minutes.
  9. Add the mushrooms and saute for 5 minutes. The onion should be translucent and the mushrooms are giving off some of their liquid.
  10. Add the ale to the large pot and stir to loosen any browned bits on the bottom of the pan.
  11. Return the meat back into the large pan. Add the broth, sage, and thyme.
  12. Bring the mixture to a boil. Remove from heat and allow to cool slightly before transferring the beef mixture into a casserole dish.
  13. Bake the beef mixture for 45 minutes to 1 hour. The meat should be tender but not dry.
  14. Remove the beef from the oven and turn the oven to 425 degrees F.
  15. Remove the egg mixture from the refrigerator and fold in the stiffly beaten egg whites.
  16. Cover the beef mixture with the egg mixture topping and bake for 15 minutes. 
  17. Reduce the oven to 400 degrees F.
  18. Bake the dish for another 10 to 15 minutes. 
  19. Note: check the liquid level of the dish so the meat mixture doesn't dry out.
Recipe from my friend Tracey. Thank you Tracey for giving me permission to use it. It was delicious!
Did you already know...
-In 1896, the first modern day summer Olympics was held in Greece.
-The first  winter Olympics was held in France in 1924. 
-The 2014 Olympics will be held in Russia and then followed by the 2016 Olympics being held in Brazil.

Sunday, August 5, 2012

Peacharine Cream Cheese Tart

This is a regular scheduled interruption from the British postings. All right I will admit I'm pretty good at math but when it comes to conversions, I need extra practice. Oh, these British recipes are giving me some practice. When I have mastered some recipes by remaking them, I will have some delicious recipes to share. 
At least, I had no problem making this delicious cream cheese tart. This recipe was picked by Emily of A Gilt Nutmeg for the Pastry Queen Project. I know it came out pretty good when my husband told me that he doesn't normally like peaches but this tart is oh so good. He ate two. (This is how I get my husband to eat fruit occasionally.) Now, you can easily substitute another type of fruit for the topping like apples or pears. I actually used peacharines instead of peaches. I think only half of each peacharine made it into the dessert. Oh, how I love peaches and nectarines but peacharines are the best of two loves.
Peacharine Cream Cheese Tart
Lemon Zest Tart Crust:
2 cups all purpose flour
1/2 tsp salt
1/3 cup sugar
1 tsp lemon zest
11 Tbsp chilled unsalted butter, cut into 1/2 inch pieces
1 egg
1/4 cup heavy cream, chilled

Cheese Filling:
16 oz. cream cheese, softened
1/2 cup sugar
1 Tbsp vanilla extract
2 eggs
1 tsp lemon zest
1/2 cup all purpose flour
1/4 tsp salt

Fruit Topping:
2 tsp ground cinnamon
1/2 cup sugar
5 large peaches, sliced thin

Glaze:
1/2 cup apricot jam
1/4 cup water

To make the tart crust:
  1. In a food processor, add the flour, salt, sugar, and lemon zest.
  2. Pulse the flour mixture for about 30 seconds.
  3. Add the chilled butter and pulse about 20 times. The mixture should look crumbly with bits of dough the size of dried peas.
  4. In a small bowl, whisk the egg and heavy cream together.
  5. Slowly, add 1/2 of the beaten egg mixture to the food processor while it is running. Continue to slowly add more egg mixture if needed until the dough forms a ball. (I only had to use 1/2 of the egg mixture.)
  6. Pat the dough into a disk and wrap with plastic wrap. Refrigerate for at least 1 hour.
To make the filling:
  1. In a mixer, cream the cream cheese and sugar until fluffy.
  2. Add the vanilla and eggs. Beat for 1 minute on medium high speed.
  3. Add the lemon zest, flour, and salt. Mix until incorporated. Set aside.
To assemble the tart:
  1. Preheat oven to 375 degrees F.
  2. Take the dough out of the refrigerator. 
  3. Roll the dough to 1/8 inch thickness.
  4. Using a large glass or biscuit cutter, cut out 4 inch circles.
  5. Add the circles to a muffin tin and form the dough into the cups.
  6. Add about 3 Tbsp cream cheese mixture into the center of each dough cups. Place in the refrigerator until needed.
To make the fruit topping:
  1. In a medium bowl, combine the ground cinnamon, sugar, and sliced fruit.
  2. Top each cream cheese mixture with the sliced fruit. 
  3. Bake the tarts for about 30 to 40 minutes. The tart crust should be golden brown.
To make the glaze:
  1. About 10 minutes before the tarts are done baking, combine the apricot jam with the water. Set aside until needed. 
To complete the tarts:
  1. Remove the tarts from the oven and brush each tart immediately with the glaze.
  2. Allow the tarts to cool for at least 1 hour before serving.
  3. When cooled, cover tightly and refrigerate for up to 2 days.
  4. Serve at room temperature.
Recipe adapted from The Pastry Queen cookbook by Rebecca Rather.
Did you already know...
-Peacharines are an hybriad of a peach and a nectarine.
-The peacharine has minimal fuzz with a milder taste than a peach.
-Peacharines are high in Carotene and Vitamin C.

Thursday, August 2, 2012

English Pancakes

I have never had English pancakes before. Have you? The best way to describe them would be a cross between a crepe and a pancake. They are delicate and light. The pancake by itself is plan but that is why toppings are great!
 
When I was researching them, many sites served the pancakes with lemon. Lemon? I wouldn't have thought to top my pancakes with lemon. I had to try it. Now, I like lemonade so I liked the lemon and sugar topping. It is funny of all the new foods I make the kids did not want to try these pancakes. I did talk my son into trying the pancakes with lemon and he liked them. My youngest daughter wanted just sugar. My oldest daughter wanted stewed strawberries. The hardest thing about these pancakes was flipping them. It took a little practice.
 
English Pancakes
1 cup flour
1/4 tsp salt
1 egg 
1 egg yolk
1 1/8 cup milk
1 Tbsp melted butter
little vegetable oil or melted butter to coat the skillet
white sugar and lemon juice for topping

Directions:
  1. In a medium bowl, sift together the flour and salt.
  2. Make a well in the center of the flour and add the egg, egg yolk, and 1/2 of the milk. Whisk.
  3. Add the remaining 1/2 of the milk and the melted butter. Whisk well.
  4. Heat an 8 inch skillet over medium heat until hot.
  5. Add the oil or butter and heat for a few seconds.
  6. Add about 2 Tbsp of the pancake batter to the skillet. Swirl the batter in the skillet to coat the bottom of the pan. 
  7. Cook the pancake about 30 seconds before flipping.
  8. Remove from pan onto a plate. 
  9. Top the pancake with the sugar and lemon. Roll up the pancake.
Recipe adapted from A Bowl of Mush website.
Did you already know...
-English pancakes are a popular dish to make on Shove Tuesday.
-Shove Tuesday (Pancake Day) is the day before Lent.
-On Pancake Day, some English towns hold pancake races in which women will race to a finish line while carrying a skillet and flipping pancakes.
She was trying to distract me while I took my photos! Isn't she sweet
I decided not to post the photo of her making faces at me!

Monday, July 30, 2012

Bangers and Mash

Since my oldest daughter just returned from England, I asked her if she had Bangers and Mash when she was over there. She said no so I asked her if she saw it on the menu. She said yes but she didn't know what it was. My Dad said she never asked. My Dad said Bangers and Mash is a common pub dish. 
I told my daughter that Bangers and Mash is sausage and mashed potatoes. She said she would have ate it if she had known. My family really liked this dish very much. It is an easy dish to make. The sausage and potatoes are served with a sauce or gravy. I will admit that I don't know how authentic my dishes will be this week but they taste good. The traditional gravy is made with a stock but when I went into the pantry I couldn't find any. The meal was done and I didn't feel like having anyone wait so I decided to make ours cheesy.
Bangers and Mash
2 lbs. russet potatoes, peeled and diced
8 links beef sausage
1 Tbsp vegetable oil
1 large onion, sliced
2 Tbsp flour
4 cups milk
 1/4 cup Cheddar Cheese
2 Tbsp butter
2 Tbsp milk
2 Tbsp heavy cream
salt and pepper

Directions:
  1. In a large saucepan, cover the potatoes with cold water.
  2. Bring the potatoes to a boil and simmer for 20 minutes.
  3. In a skillet, add the oil and heat over medium heat.
  4. Add the sausage to the skillet and brown.
  5. Remove the sausage and place on a plate to the side.
  6. To the skillet, add the onion to the pan. Cook the onion until soft about 5 minutes.
  7. Add the flour to the skillet and cook for 1 minute. 
  8. Whisk in the milk to the skillet and return the sausage to the pan.
  9. Cook the sausage for about 15 minutes until the liquid is reduce to the desired consistency. Stirring occasionally. 
  10. Stir in the cheese.
  11. When the potatoes are done, drain the potatoes and mash.
  12. To the mashed potatoes, add the butter, milk, heavy cream, salt, and pepper. 
  13. To serve, place the mashed potatoes on a plate. Place the sausage on top of the potatoes. Cover the sausage and potatoes with the cheese sauce. 
Recipe adapted from Foodnetwork. com.
Did you already know...
-Bangers and Mash is a traditional English meal. 
-Bangers and Mash are often served with an onion gravy.
-A popular side to Bangers and Mash is peas.

Sunday, July 29, 2012

Dulce de Leche Macaroons

This week's Project Pastry Queen was picked by Missy of Creative Missy. The Macaroons are rich, sweet, and delicious. My youngest daughter loves Dulce de Leche so she thought I should shouldn't be adding it to coconut but these are good. My Mom loves Macaroons and she liked them. 
I didn't add anything else to the batch I made. You can add chocolate or toasted almonds but I kept it simple. I wish I had thought to add English toffee to them since I have been making English fare but next time I will. My next post will be back to my culinary English journey.
Dulce de Leche Macaroons
1 can of Dulce de Leche (click here for recipe)
3 cups lightly packed sweetened flaked coconut
2 tsp vanilla extract

Directions:
  1. Preheat oven to 350 degrees F.
  2. Line a baking sheet with parchment paper.
  3. In a medium bowl, combine the cooled Dulce de Leche, coconut, and vanilla. Stir until combined.
  4. Using a 1 3/4 inch diameter scoop, spoon a firmly packed spoonful of the coconut mixture onto the parchment lined baking sheet. Space the coconut mixture about 1 1/2 inches apart.
  5. With a wet fingertip, lightly flatten the coconut mixture gently.
  6. Bake the Macaroons for 12 to 14 minutes. The edges should be dark brown and crisp.
  7. Allow the Macaroons to cool for 10 to 15 minutes.
Recipe adapted from The Pastry Queen cookbook by Rebecca Rather.
Did you already know...
-Toffee became popular in England in the late 1800s.
-In 1889, a toffee house owned by Mrs. Bushell was located outside the Everton Football Club (Everton FC).
-Many football patrons purchased vast quantities of the toffee.
-In 1892, the football club was moved and Mrs. Bushell received permission to sell her toffee inside the football stadium before the games.
-The Everton FC's nickname is The Toffees.
-In America, Everton FC is a soccer team.

Friday, July 27, 2012

Olympics begins

Since the Olympics opening ceremony is tonight, I thought scones would be a fitting way to use up the remaining raspberries I have. Next week, I am going to post some British dishes. This is going to be a culinary journey for my family. Yes, this even includes my oldest daughter since she ate mostly hamburgers when she was in England.
A couple years ago, my husband and I spent the night in England but it was only because we were in transit. We arrived when it was dark outside and we left at dawn. We did not enjoy warm scones but we were able to get our passport stamped. Next time, we will stay longer.
I love scones since they are easy to make and make a quick breakfast for the next day. My youngest daughter likes scones since they are similar to muffins and biscuits. My youngest son just like to say the name scones. Would you like some scones this morning?

Raspberry Cream Cheese Scones
2 1/2 cups all purpose flour
5 Tbsp unsalted butter, cold and cut into small pieces
1/2 cup sugar
2 tsp baking powder
1/4 tsp salt
7 Tbsp cream cheese, softened
1/3 cup milk
1 egg, lightly beaten
1/2 cup fresh raspberries

Directions:
  1. Preheat oven to 400 degrees F.
  2. Line a baking sheet with parchment paper and set aside.
  3. In a medium bowl, gently stir cream cheese, milk, and egg together until combined.
  4. In a large bowl, whisk together the flour, baking powder, salt, and sugar.
  5. Cut in the butter to the flour mixture using your hands, pastry blender, or two forks until the mixture resembles fine crumbs.
  6. Create a well in the center of the flour mixture and add the cream cheese mixture with the raspberries.
  7. Carefully, mix together the dough.
  8. Form the dough into a circle 1 inch thick.
  9. Cut 2 inch circles into the dough and place the circles on the parchment paper spacing about 1 inch apart.
  10. Carefully gather the remaining scrapes and cut out a few more circles while trying not to rework the dough to much.
  11. Bake the scones for 20 minutes or until golden brown and cooked through.   
Recipe adapted from Raspberri Cupcakes.
Did you already know...
-Great Britain comprises of England, Scotland, and Wales.
-Scones originate from Scotland.
-The United Kingdom comprises of England, Northern Ireland, Scotland, and Wales.

Thursday, July 26, 2012

Raspberry cheesecake

I am always surprised how advance technology has advanced but sometimes I am surprised we haven't advanced to The Jetsons technology yet. Do you remember The Jetsons? I always liked Rosey the robot. 
 The reason I thought about The Jetsons was because my family are big gamers. They play on the PS3 with other family members and friends. I choice to blog. The other day my sister was playing and she has a Bluetooth so she can talk during the game. Since she knew my husband was playing, my nieces said hi to him. My children heard their cousin,s voices and started to talk to the TV. Of course, my nieces couldn't hear them. Since my sister only lives within 20 minutes of me, I think we will pass when The Jetson's TV monitor comes out. Just picture this- I go downstairs in my pjs (which means my old t-shirts since they are comfy but I can't wear them out) and I am greeted full screen by someone I would rather not see me. It just isn't going to happen no matter how much my husband tries. No Jetson's TVs in this household. How about you? Would you get one? I am not talking about Skype either just the next level of Skype.
Raspberry Cheesecake 
1 1/4 cups graham cracker crumbs
4 Tbsp. unsalted butter, melted
3 Tbsp. sugar for the crust

Tuesday, July 24, 2012

Raspberry Cream Sandwiches

I will admit my favorite way to eat raspberries are plain. I also love adding raspberries to my cereal. I add a little cereal and a lot of milk so I end up eating mostly raspberries with milk. What is your favorite way to eat raspberries? I know my daughters prefer plain.
 Since we normally eat the raspberries before I can make any recipes, I went raspberry picking twice this year. We probably will go again but it will be for some golden raspberries. Have you ever seen a golden raspberry? I saw this recipe at the beginning of the year and I bookmarked it. The cookie is a nice sugar cookie in which my daughter preferred with no filling. My husband saw me scrapping the vanilla bean and asked me what was I doing. I held out the vanilla bean and asked him to smell. He hesitated so my son did. My son looked up at his dad and said it is vanilla. My husband confirmed it was vanilla. I think my son spends a lot of time in the kitchen with me. Now, how do I get my husband in their more often is the question?
 Raspberry Cream Sandwiches
1 3/4 all purpose flour
2 tsp baking soda
1/4 tsp salt
10 Tbsp unsalted butter, softened
1 1/2 cups sugar
1 egg
1 Tbsp vanilla extract
1 vanilla bean, halved lengthwise, seeds scraped and reserved
1 1/3 cups fresh raspberries
1 Tbsp sugar, for the filling
7 oz. white chocolate, coarsely chopped
1/3 cup heavy cream

Directions:
  1. Preheat oven to 350 degrees F. 
  2. Line a baking sheet with parchment paper and set aside.
  3. In a large bowl, whisk together the flour, baking soda, and salt. 
  4. In another bowl, cream the butter and sugar together.
  5. Add the egg, vanilla, and scraped vanilla seeds into the sugar butter. Mix until smooth.
  6. Gradually add the flour mixture to the sugar butter mixture.
  7. Scoop 1 inch mounds of dough onto the baking sheet spacing the dough 2 inches apart. 
  8. Bake the cookies for 4 minutes and then rotate.
  9. Bake the cookies for another 4 to 5 minutes or until the cookies are golden.
  10. Allow the cookies to cool on wire racks.
  11. In a food processor, puree the raspberries and the sugar to make the filling.
  12. Pour the raspberries through a fine sieve to extract the juice and remove the seeds.
  13. Melt the chocolate in a double broiler over simmering water.
  14. Remove the melted chocolate from the heat and whisk in the cream in a slow, steady stream.
  15. Add the raspberry mixture to the chocolate. Whisk slowly until pale about 3 minutes. 
  16. Refrigerate the raspberry chocolate mixture for about 30 minutes.
  17. To assemble the cookies by spreading 1 Tbsp of the raspberry chocolate mixture on the bottom of one cookie. 
  18. Add another cookie to sandwich the filling in the middle.
  19. Cookies can be refrigerated between layers of wax paper in an airtight container at room temperature up to 2 days.
Recipe adapted from Martha Stewart's Cookies.
Did you already know...
-Different types of raspberries include red, golden, purple, and black.
-It is believed raspberries originated from Southeast Asia.
-Raspberries have a hollow core. Blackberries are not hollow in the center.

Monday, July 23, 2012

Raspberry Phyllo Tarts


Since I really didn't think you had enough berries recipes already, I will (just for you) post a few raspberry recipes. Oh, your welcome. You don't have to thank me. My children have been thanking me lately. They must be my children since they aren't complaining yet.
If you couldn't tell by now, I love berries. So, I was looking up raspberry recipe in Cooking Light Annual Recipes 2008 cookbook and noticed a raspberry Phyllo tart recipe. It looked easy. It looked quick and I totally changed it besides a few ingredients. All of my tarts were gone within the hour. So, here is my inspired recipe from Cooking Light.
Raspberry Phyllo Tart Recipe
1 (2.1 oz.) package of mini phyllo shells
4 oz. reduced fat cream cheese, softened
2 Tbsp honey
1/4 tsp almond extract
1/2 cup chopped almonds, toasted
1/4 cup raspberries
Crushed almonds and additional raspberries for garnish


Directions:
  1. Preheat oven to 350 degrees F.
  2. Place shells on a baking sheet.
  3. In a medium bowl, combine the cream cheese, honey, and almond extract.
  4. Stir in 1/4 cup of the chopped almonds and the 1/4 cup raspberries. Mix until well combined.
  5. Spoon in about 1 tsp of the cream cheese mixture into the Phyllo shells.
  6. Bake the shells for about 5 minutes and rotate pan.
  7. Bake the shells for another 5 minutes or until the cream cheese mixture is firm.
  8. Remove the shells from the oven and allow to cool for about 5 minutes.
  9. Top the shells with crushed almonds and raspberries if desired.
 Recipe created by Jen of Sweet Morris.
 Did you already know...
-Another name for phyllo is filo or fillo. 
-The largest producer of phyllo products is Athens Foods.
-Phyllo dough has been produced since the Ottoman Empire but Athens foods have been producing it for over 50 years.

Sunday, July 22, 2012

Chock Full of Nuts Cookies

I love nuts in my cookies. So, I was very glad this recipe was not previously picked the members of The Project Pastry Queen. If you take a cookie and add four different types of nuts to it, this is the cookie you would have. Any other type of nuts can easily be substituted to your taste but why mess with perfection. Please check out the other members to see if they substituted different nuts in their cookies.
The hardest thing about making this recipe was keeping my children away from the toasted macadamia nuts. Alright, I will admit I did sample a couple of them but it was only for quality purposes. I did half the amount of the almond extract but added the omitted extract to the vanilla extract. 
Chock-Full-of-Nuts Cookies
3 cups pecan pieces
1 1/2 cups chopped macadamia nuts
1 1/2 cups chopped walnuts
1 1/2 cups slivered blanched almonds
1 1/2 cups butter, at room temperature
1 1/2 cups sugar
1 1/2 cups firmly packed brown sugar
3 large eggs
1 1/2 Tbsp vanilla extract
1 1/2 tsp almond extract
3 1/2 cups all purpose flour 
1 1/2 tsp baking soda
1 tsp salt

Directions:
  1. Preheat the oven to 350 degrees F.
  2. On a baking sheet, arrange the nuts in a single layer and toast them for 7 to 9 minutes or until golden brown.
  3. Allow the nuts to cool for 5 minutes.
  4. Chop the nuts into smaller pieces.
  5. Line the baking sheet with parchment paper.
  6. In a large bowl, cream the butter and both sugars until light and fluffy.
  7. Add the eggs, vanilla extract, and almond extract. Beat for 1 minute.
  8. Add the flour, baking soda, and salt. Beat for about 30 seconds or until the ingredients are thoroughly mixed.
  9. Stir in the nuts until combined.
  10. Scoop the dough about the size of a gold ball onto the baking sheet about 2 inches apart.
  11. Bake the cookies for 10 to 12 minutes and the cookies are golden brown around the edges with no raw looking dough in the middle. 
  12. Allow the cookies to cool for 10 minutes before transferring to a cooling rack.
The 6 1/2 dozen cookies will keep for 3 to 4 days in an airtight container or frozen well wrapped for up to 1 month. 
Recipe adapted from The Pastry Queen by Rebecca Rather. 
Did you already know...
-Hawaii grows 90% of the macadamia nuts worldwide.
-The macadamia nut is not native to Hawaii.
-A macadamia nut tree was first planted around 1881. 
-The macadamia nut originated from Australia.

Thursday, July 19, 2012

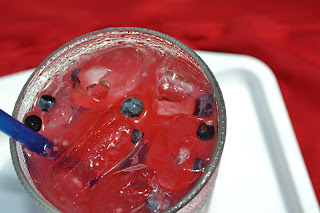
Berry Lemonade

My favorite drink is Sweet Tea. Oh, today's blog isn't about Sweet Tea but my second favorite drink: the great, the tangy, lemonade. Yea! My favorite friend asked if I still had some blueberries left. My supply is slow diminishing but don't worry I am going to freeze the rest.
Some children have their Dad build them tree houses. My oldest daughter had her Dad build her a lemonade stand. It turned out pretty good. My youngest children have already been trying to talk me into letting them put up the stand. Then I would have to share my lemonade and that is pretty hard. Now, the sweets I make I have no problem sharing but lemonade is a different problem.
Berry Lemonade
2 cups water for the sugar syrup
2 cups sugar for the sugar syrup
3 cups water
2 cups freshly squeezed lemon juice
1 cup freshly squeezed lime juice
2 cups of fresh berries (I used blueberries and raspberries.)
3 cups ice cubes

Directions:
  1. In a medium saucepan, combine 2 cups of water with the 2 cups of sugar to make the sugar syrup.
  2. Heat the water and sugar over medium heat and boil for 10 minutes.
  3. Allow the sugar water to cool and refrigerate for about 30 minutes or until ready to use.
  4. In a large pitcher, combine 2 cups of the chilled sugar syrup, 3 cups of water, lemon juice, and lime juice.
  5. In a small bowl, add 1 cup of the fresh berries and smash for about 20 seconds.
  6. Add the smashed berries and the remaining 1 cup of fresh berries to the pitcher. Stir well.
  7. Add the ice cubes and serve.
Recipe adapted from The Pastry Queen by Rebecca Rather.
Did you already know....
-One lemon will produce about 2 to 3 Tbsp of juice.
-According to Guinness World Records, the largest lemon weighed  11 lbs. 9.7 oz.
-The largest lemon was grown in Israel in 2003.